Audio React group
The Audio React group lets you use audio tracks to affect the animation of the particle form. Form can extract loudness data from audio files and create keyframes automatically to drive other controls in the plug-in. The five Reactors offer controls that let you specify frequency ranges (such as bass, midtones, or trebles) that then drive a specific parameter based on the loudness of the frequency over time.
Audio Layer pop-up
Select the audio layer to use. Note: When working on Windows, we recommend using 44Khz, 16-bit .wav files. These seem to process much faster than other audio formats, and .mp3 format seems to be particularly slow. You can use QuickTime Player Pro or another audio processing tool to convert other formats to .wav files.

Example of a Reactor
All five Audio Reactors offer exactly the same set of controls. It is helpful to have multiple controls that can drive different values with the Map To command.
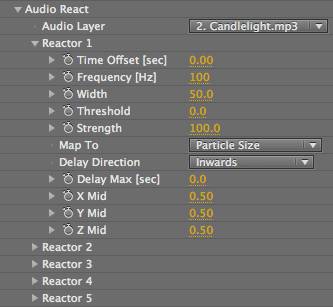
Before we get into the controls, it is helpful to look at an example of using Audio Reactor controls. In the example below, we have an audio layer chosen, Candlelight.mp3, as the source file that drives the animation. The Audio React settings listed below create the animation that you see. All other Form settings are at their defaults.
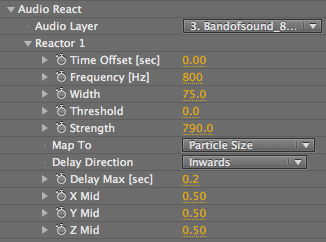
Reactor 1 is open and the Time Offset is 0.00, making the current time of the playhead grab the audio sample. Next, Frequency and Width are set to choose a band of sound centered at 800 Hz with a width of 75 Hz. This means that we are instructing Form to only listen to a selected range of sound in the midtones, centered around 800 Hz.
Here is a sample of the 'band of sound' that Form is extracting: 800 Hz sample. Within that specified sound, Form will evaluate the loudness and assign a number to drive the Particle Size as designated in the Map To pop-up. In the Particle group, the Particle Size is set to 2. Form computes the loudness, multiplies it by the Strength factor, multiplies that by the Particle Size, and then draws each particle at that multiplied size.
If Delay Max is set to 0, Form will simply change the Particle Size across the entire grid at that instant in time. But what if we want a ripple effect, or a movement that seems to travel across the grid in time with the music? That's where Delay Direction and Delay Max come in. To create an effect over time, Form must specify where and when the reactor will apply the Particle Size. The Delay Direction is set to move inward (from the outer edges of the form shape in 3D space) over a Delay Max period of 0.2 seconds, which creates a rippling change in the Particle Size.
Whew! It sounds crazy, but these simple steps let you generate dynamic visuals in just a few seconds. See our result below.
![]()
Left to right, the settings for our animation.
Time Offset [sec]
Adjusts the timing of the reactor. Time Offset basically slides the time sampling forward or backward from the current Timeline indicator.
Frequency
Defines the active frequency for the Reactor. For example, roughly 50-500 Hz is the bass, 500-5000 Hz is the midtones and above 5000 Hz is the highs/trebles.
Width
Defines how wide the Frequency response is that Form will use to sample the loudness from the audio. A Width of 100 means the Frequency is wide. A Width of 1 is a very narrow, specific Frequency response. To select only the sound from a bass drum, for instance, you would want to select a low Frequency and a relatively narrow Width.
Threshold
This value is subtracted from the output so that a minimum level is required for any visible effect. Threshold is useful when there is a lot of background noise in a recording, or wide-frequency sounds that interfere with the desired sounds.
Strength
Defines how strong the effect is, and is used as a multiplier to the Map To option. Large Strength values can cause huge changes in the image, so use this control carefully.
Since this value is a multiplier, you will need to set some value in the control that the Reactor is affecting. For example, if the Map To is set to the Disperse value, then you need to set a Disperse value that is greater than 0.
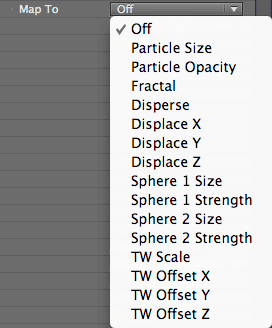
Map To pop-up
The Audio Reactor can drive other controls in Form. For example, choose Particle Size from the Map To menu to alter the current Particle Size setting in the Particle group. To define which controls will be affected, choose from the pop-up menu.
 |
Displace X, Displace Y, Displace Z Sphere 1 Strength, Sphere 2 Strength TW Scale (Transform Scale) TW Offset X (Transform Offset) TW Offset Y (Transform Offset) TW Offset Z (Transform Offset) |
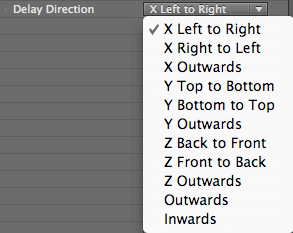
Delay Direction pop-up
Lets you select the direction in which the audio reactor delay travels or ripples through the form. This is used together with the Delay Max control to allow the system to generate a traveling animation that is offset in the chosen direction over the period set by Delay Max.
 |


This example shows a X Left to Right Reactor used to drive Disperse, with a Delay Max of 0.25 seconds.
Left to right: No dispersion; Dispersion starts on left; Dispersion moves across midpoint; Dispersion completes one traversal in 0.25 seconds.
Delay Max
Defines the length of the delay buffer, which is the maximum time a sound stays 'visible' as ripples in the Delay Direction option chosen above.
X Mid, Y Mid, Z Mid
Defines the position in 3D space inside the particle grid where the sound is first/last seen, which is the point where sounds ripple from or toward. Active for the Delay Directions of Outwards and Inwards.