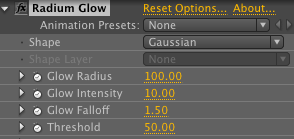
Radium Glow plug-in: Main controls
Radium Glow creates beautiful glows. This page discusses the initial main settings that affect the size and appearance of the glow and the Shape pop-up options. We will refer often to a 'bmap', which stands for 'brightness map'.
The plug-in has three other control groups. The Input group lets you change the channels source, interpolation quality, and change the brightness map. The Mask group lets you use a simple elliptical mask to constrain the glow area with the option to input another layer or source as a mask. The Output group lets you change viewing options, and control the compositing of the glow and source image.
Main controls
The glow is set up initially by the three Glow controls and Threshold. To summarize: The brighter the pixel, the bigger the glow. The darker the pixel, the smaller the glow.

Glow Radius
Radius sets the maximum radius (or width) of the glow area that is created around the brightest areas of the glow layer. The higher the value, the bigger the glow. The default value is 100. Since this radius acts as the control, and its value is measured from the center of the glow point, the output is actually twice as wide as this value.
Note: The bigger the Radius, the slower the rendering. The maximum value is 500, which can result in very long render times but depends on the source layer.
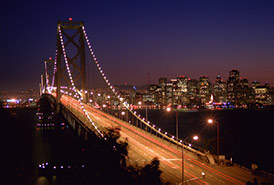
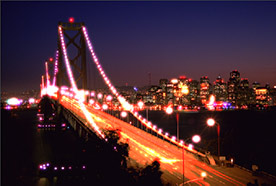
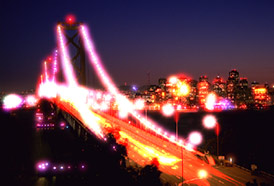
At left, the original photo from ArtBeats. In middle, Glow Radius 60. At right, Glow Radius 100 (default).
Glow Intensity
Glow Intensity sets the brightness of the glow. The higher the value, the brighter and more intense the glow. Default value is 10.
Intensity is measured as a percentage. The control sets the brightness value at each pixel that is affected by the glow. This means that a value of 1.0 does not create a value of 1.0 on each brightness area. Instead, that pixel takes on a percentage of the maximum possible glow. Since the glow is additive internally, lots of bright points in the bmap can result in extremely high intensities in the thousands of percent! This is often much too bright to be usable, so the Prevent Overbright control is available to make the glow more output-friendly. (See Output Group.)
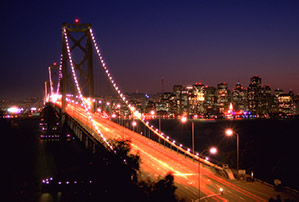
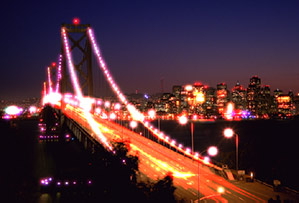
Radius 60. At left, Glow Intensity 2. At right, Glow Intensity 10.
Glow Falloff
This is a gamma (or luminance) compensation for the bmap. Values less than 1.0 will create more areas of brightness in the bmap. Values greater than 1.0 will dim the overall bmap and create a much less pronounced glow. This means that lower values will generate longer color gradations and more glow; higher values yield shorter gradation and less glow. Default value is 1.5.
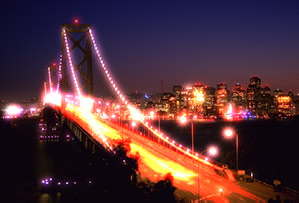
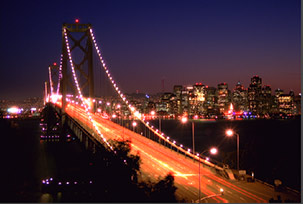
Radius 60, Intensity 2. At left, Glow Falloff 0.7. At right, Glow Falloff 1.5.
Threshold
The Threshold value sets the darkest pixel that will have glow applied. The lower the Threshold value, the more pixels will be affected by the glow. The default setting is 50. The practical values are image dependent. On a really contrasty image, the default of 50 is a good choice. On a low contrast image, you would probably stay between 10 and 25.
You can really see how Threshold affects the amount of glow by looking at the Output> View> Brightness Map option, which shows you the portions of the image that are affected by the glow. (See Input group.) Pay attention to Threshold. if you don't have it set low enough, you may not see the glow applied.
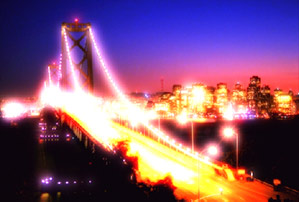
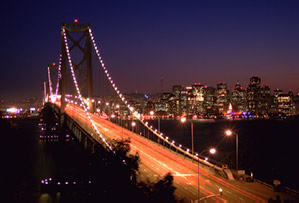
Radius 60, Intensity 2, Falloff 1.5. At left, a Glow Threshold of 1. At right, a Glow Threshold of 60.
Shape pop-up
There are 14 options in the Shape pop-up list. The first 13 options are different kinds of circular shapes. The smaller the point affected by a glow, the less of a substantial difference you'll see between many of the shapes. Selecting the final option, Custom Glow Shape, will activate the Shape Layer control. (See below, Shape Layer.)
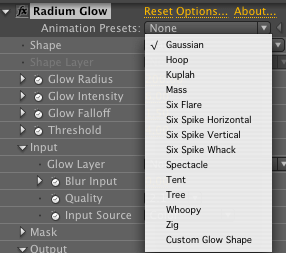
The built-in shapes available from the menu.


From left to right: Gaussian (default), Kuplah, and Six Spike Horizontal shapes.
Shape Layer
Selecting the Custom Glow Shape in the Shape pop-up gives you the ability to add in a custom shape as your glow. When you first Choose Shape> Custom Glow Shape, the Shape Layer popup will read as None, and the source graphic will temporarily disappear. Once you choose an item from the Shape Layer pop-up, the source image will reappear and its glow will take on the shape of the layer being pointed to. You have many choices for a custom shape, including creating a mask layer in After Effects, or using an imported bitmap graphic or QuickTime movie.

The Shape menu set to custom activates the Shape Layer control.
The Shape Layer looks at the RGB value of the layer that you're pointing to. It translates that RGB value into a grayscale map, and that shape is applied to the glow. White areas of the Shape Layer are opaque, black is transparent, and shades of gray are semi-transparent. You CAN choose the source layer as the Shape Layer, but this will typically be ineffective as it will not have a defined grayscale shape to translate.


Below and above, the custom shape that is loaded and the glow shape it creates. The flower images are Photoshop JPEGs. The zigzag is an After Effects shape mask.