
What is Magic Bullet Denoiser II?
Noisy, grainy footage distracts from the story you're telling. Enter Magic Bullet Denoiser II, your new tool for cleaning video footage without a lot of fuss. Denoiser II removes noise grain and artifacts while leaving the image details intact. We rewrote the product to increase the reliability and quality while keeping every powerful, professional feature that you liked in Denoiser 1.
Choose your level of use with Denoiser II, from smart default settings that give speedy smoothing to advanced options that let you treat more difficult clips. Get great-looking results so your story is seen through the noise.
What is noise?
'Noise' is enlarged pixels or extra bits of digital data scattered throughout an image. Noise manifests as a texturing of flat regions where no texture was intended. In digital video, noise can often be seen in DV footage that was shot in low light or poorly-lit environments. In film, the phenomenon is associated with the image formation process and results in 'grain' noise, a natural consequence of the scanning of film. Noise can look like color speckles -- red and blue speckles in a purple shirt, for instance -- that are unwanted in the image.
Noise reduction is a subjective process, especially when you think about the destination of the footage. A picture may look just fine on a small mobile phone display, but too blurry on a large flat panel display. What looks sharp to one viewer may look blurry to another. A lot of noise can even make the footage details seem obscured or cause color to appear washed out.
Removing noise requires the right trade-off for the intended purpose of the media. You need remove the graininess but don't want your footage to look too smooth or take on a 'dirty window' effect. Luckily, Denoiser does a lot of this work for you and its parameter defaults work great for a wide range of material. Read about the main controls.
Left to right, before and after Denoiser II is applied. The 'before' image looks grainy while the 'after' image looks smooth, though the subject's facial detail is intact.
Choose your project settings
Denoiser II takes on the quality of your project settings.
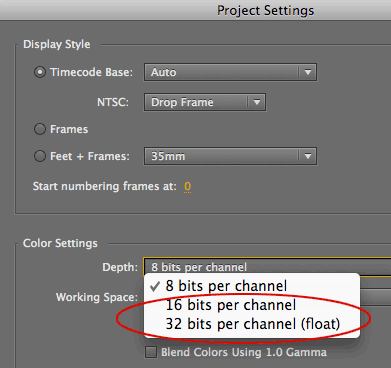
• In After Effects, go to File> Project Settings, and set Color Settings> Depth to 16-bit or 32-bit (float).
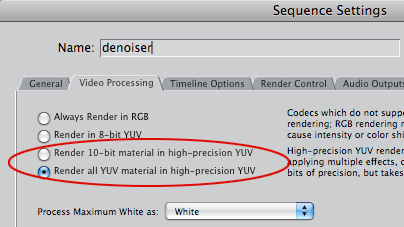
• In Final Cut Pro 7, go to Sequence Settings> Video Processing, and choose Render 10-bit or All YUV.
Learn about getting started with Denoiser on this page, How Denoiser II Works.