How Denoiser II works
How does Denoiser II work? Very simply. Many times you should get good results with Denoiser by simply applying it to your footage.
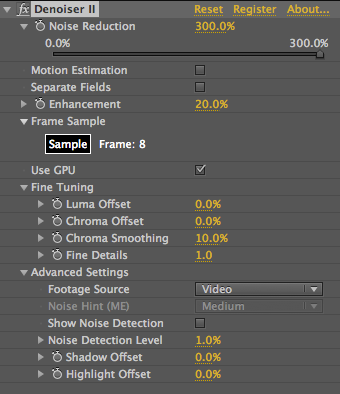
When you apply Denoiser, the plug-in automatically selects a sample frame to work from. This sample is always the frame that your Time Marker is parked on. Denoiser works its magic by combining information over several frames to separate the noise from the image. It does this by analyzing your sample frame and looking at a few frames surrounding it.
Choosing the sample frame
In most cases, you do not need to select the sample frame. Denoiser will do this for you automatically, as it bases its noise estimation on the frame that your Time Marker is at.
Denoiser does not use every frame in a sequence to learn about the noise. Denoiser automatically calculates the sample regions so its estimation uses the flat areas containing noise and not detail. This process can be viewed by selecting the Advanced option Show Noise Detection.
There are a few occasions when it is useful to hand-select the noise regions:
1- When the frames contains texture which the plug-in might mistake for noise. For instance, concrete or carpet.
2- In cases where it is difficult to automatically select good areas to sample the noise.
What frame should you select as a sample? A non-textured area in your image typically provides the best sample frame. This would be a frame with areas of flat color shot under the same lighting as the frames that you want to denoise.
Note about using Final Cut 7
When using Denoiser II in Final Cut Pro 7, you may run into problems if you are working in a multiple window setup. It's best to avoid these situations so you get the best performance from the plug-in.
One example is when you work with the Main Canvas viewer at 100% and the Video tab at 25%. If one of the windows is set to less than 100%, you will see the warning 'Draft mode' next to the Sample Frame control. Since Denoiser II can't denoise downsampled video, FCP 7 will read this as a problem because Video tab is not at full resolution.
Production tip for greenscreen
If you are shooting greenscreen, it is helpful to include a few frames of the greenscreen stage with no actor in the frame. This will help Denoiser to learn about the noise accurately, as the greenscreen itself has very little true texture.
Alternately, if you use a Production Slate on-set, you can include the slate in the lead-in to the shot that you want to denoise. A slate will provide nice areas of flat areas for the Denoiser to analyze. Analyze on one of these frames and then roll forward. The results should be much better than what you would get with just sampling an arbitrary frame of the video.