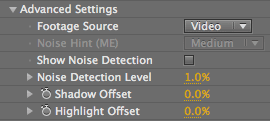
Advanced Controls
This section has important controls that let you change the way Denoiser defines and identifies noise in your footage.
Footage Source pop-up
This pop-up sets the source of your footage as Video (Luma/Chroma) or Film (RGB). Using the correct option gives the Denoiser the best chance of characterizing the noise in your camera accurately and allows to you achieve the best results.
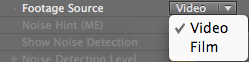
There are two Footage Source options:
• Video: The default setting, which you will typically use. Video mode lets you adjust the Luma and Chroma channels. Read more in Fine Tuning controls.
• Film: Film mode offers separate adjustments for the Red, Green, and Blue channels. The Film option is ideal for footage that was originally shot on film format (like DVX format) and later scanned as RGB. Film mode is also good for footage that has a channel which is particularly noisy; for example, if the Blue channel is underexposed, which can happen with the RED camera. Read more in Fine Tuning controls.
Show Noise Detection checkbox
This checkbox allows you to see which areas of the current frame have been used for measuring the noise. Default value is Off.
When this checkbox is On, the noise detection areas are shown as little red blocks. These red blocks mark what is perceived as noise by the plug-in. Large clumps of blocks show uniform areas that can be perceived as noise.
If you see blotchiness in a subject area or you want to smooth an area, it's important to have the Noise Detection Level set high enough to identify those areas as noise. The Show Noise Detection checkbox is a good way to make sure those areas are correctly identified, or to see what is happening overall in your clip.
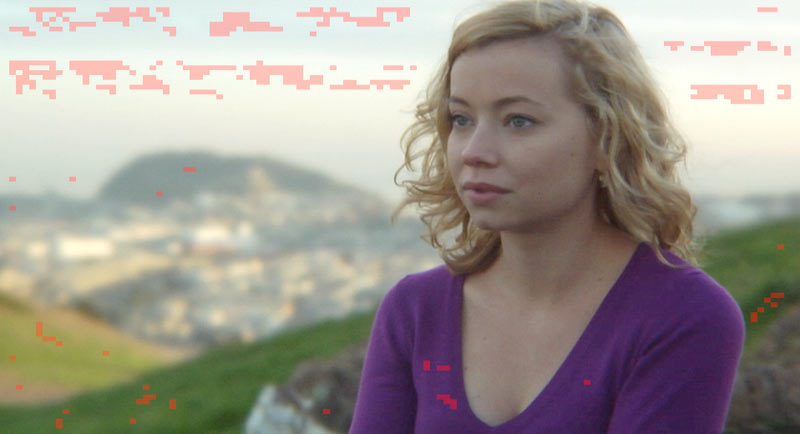
Show Noise Detection displaying the default amount of noise detection. Noise Detection Level at 20%.
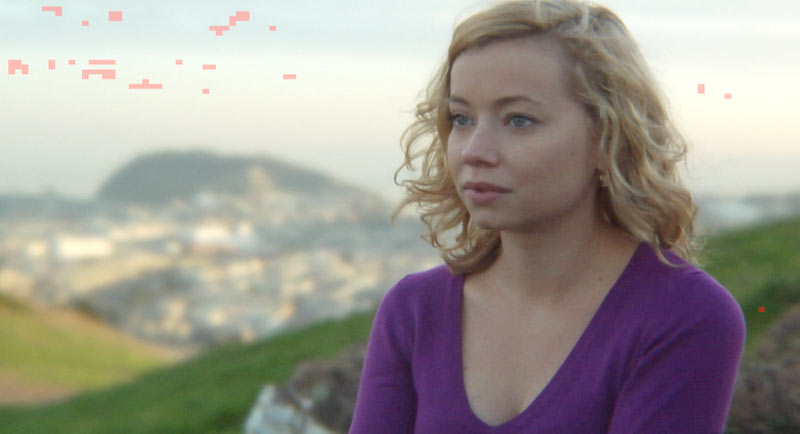
Show Noise Detection displaying a greater amount of noise detected. Noise Detection Level at 3%.
Noise Detection Level
This control sets the level of noise that you want to smooth. It does this by identifying areas in the frame as 'noise fingerprints', and adjusting the amount of the image that is used for noise measurement. This amount can only be adjusted if the current frame is being sampled for noise. For Noise Detection to become active on the current frame, you need to click the Sample Frame button.
Default value is 20%. Value range is 1 to 90%. Lower values identify fewer areas in the frame for the noise reduction and leave more noise chunkiness. Higher values identify more areas and smooth out the footage more. Note that a value of 90% does not necessarily mean that 90% of the image will be used. There is another processing method which ensures that obviously useless parts of the image are being ignored.
If you believe some areas are being used which are not truly noisy, then you should reduce the Noise Detection value. If you find that your denoised clip is too soft and reducing the Noise Reduction level does not help, then decreasing this value could help.
If you feel there are additional areas that should be used as noise fingerprints, then increase this value. If you are not achieving sufficient denoising on your clip, then increasing this value could help.
Noise Hint [ME] pop-up
This pop-up helps the Motion Estimation process do its job better, and that's what the '[ME]' in its name refers to. Noise Hint identifies whether there is a high, medium or low level of noise in the footage.
Denoising in the presence of motion is a well known chicken-and-egg problem. If you know the motion of the pixels exactly then denoising gives much more fidelity, but you only know this information if you denoise the image sequence first. Read about the Motion Estimation pop-up.
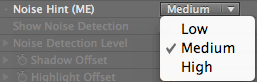
There are three Noise Hint options:
• Low: If your noise level is low but moving edges seem to be blurred, you might want to turn Noise Hint to Low.
• Medium: The default setting, which gives a good starting point.
• High: In scenes with lots of noise, the High option can help the motion estimator to improve the noise reduction. When there is a lot of noise in the sequence, the motion estimator can get fooled into tracking random noise pixels instead of tracking the underlying real image pixels. Try Noise Hint at High if you have heavy noise, like in low light situations, and you see odd artifacts or noise patterns in otherwise stationary areas after denoising. NOTE: When High is chosen, Denoiser will process faster because it's less discriminating in what it chooses to denoise, kind of like setting a tolerance.
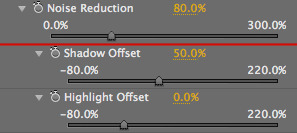
Shadow Offset, Highlight Offset
Allows you to identify more or fewer areas of shadow or highlight. This tells the noise reduction to be greater or less in the dark and bright areas of the image. These offsets behave similarly to the three Offset sliders in Fine Tuning.
Default value is 0%. Value range is -100 to 200%. A higher value does more noise reduction in the shadow (or highlight) areas, like the shadow at the model's neckline.
Shadow Offset and Highlight Offset are most useful for clips shot in low light. You might want to turn up the noise reduction in the darks and reduce it in the light areas. To do this, you could increase the Shadow Offset value to somewhere between 10 and 25% and reduce the Highlight Offset by setting the value to somewhere between -10% to -25%.
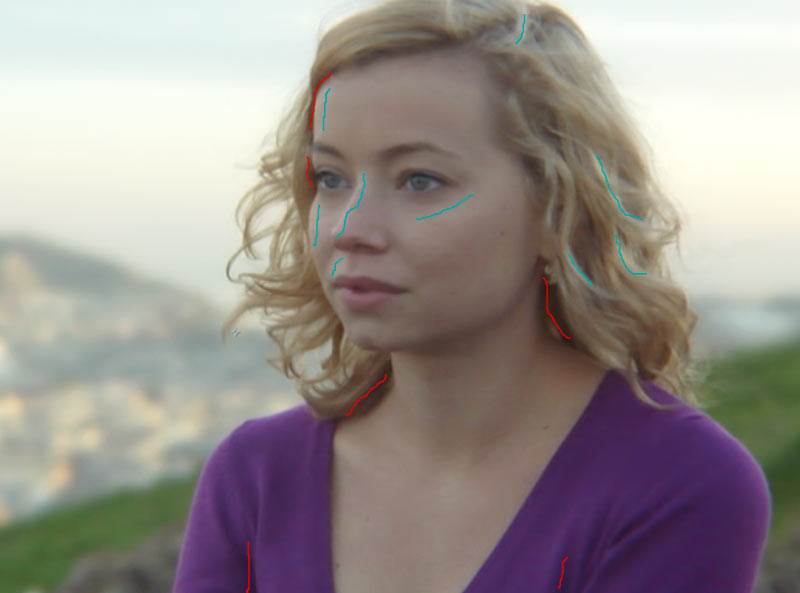
The red lines indicate shadows that are potentially smoothed more. The parts in blue are highlights that would be corrected more.
Value range for Offset sliders
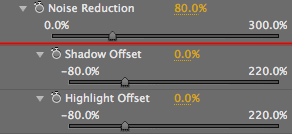
Shadow Offset and Highlight Offset change relative to the Noise Reduction value. The Offset sliders change their value range based on the value of noise reduction. This 'offsetting' ensures that the noise reduction always stays within the 0 to 300% range. The Fine Tuning Offset sliders have the same relationship to Noise Reduction.
For instance, if Noise Reduction is at 100%, then the Offsets can't add more than 200% or take away more than 100%. If Noise Reduction changes to 80%, then Offset can add 220% or take away 80%. This make the Noise Reduction control the centerpoint value for the other controls, which keeps you from overcorrecting the shadows and highlights. There is no valid number outside of 0 and 300, which keeps Denoiser from doing a maximum amount of smoothing. A value of 0 = 0% noise correction. A value of 300 = 300% smoothing of the noise signal. You can't go beyond that amount of smoothing for the shadows or highlights.
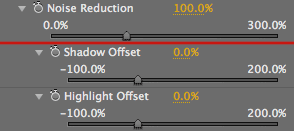
At left, when Noise Reduction is 100%, the Shadow/Highlight Offset range is -100 to 200%.
In middle, when Noise Reduction is 80%, the Shadow/Highlight Offset range is -80 to 220%.
At right, when Noise Reduction is 80% and Shadow Offset is changed to 50%, the Offset still keeps its value range based on the Noise Reduction setting.