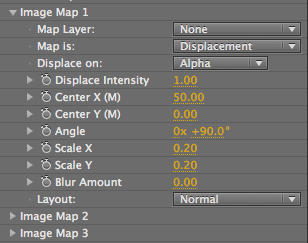
Image Map groups
The Image Map groups let you place up to three grayscale or color images in, on, or under your Psunami ocean surface for use as texture, reflection or displacement maps. Image Map 1, Image Map 2 and Image Map 3 work exactly the same way, so we'll only describe their settings once.
Having three property groups lets you use up to three displacement and/or texture maps simultaneously. When would you use more than one Image Map? Let's say that you have Image Map 1 assigned as a texture map for a logo, but but you need to make that logo sharper than the rest of the image. To do so, create Image Map 2 using the same image with all the same settings. Set the first Map to Displacement Only with a moderate Blur Amount, and the second Map to Texture Only without blurring. Make sure the texture map's alpha channel is nice and sharp for best results.
Final Cut Pro note: The Image Map groups work slightly differently in FCP. In After Effects, you select an Image Map by selecting the layer you want to use from a pop-up. In FCP, you simply drag the image you want into the image box in the parameter list. You can drag an image from the bin or from the timeline.

Image Map groups.
Map Layer pop-up
Lets you choose the layer you want to use as your Image Map. The image or movie must be present in your comp as a layer to be available as a Map. You can use color or grayscale stills or movies, with or without alpha channels, as Image Maps. Setting the Map Layer pop-up to None disables the Image Map property group.
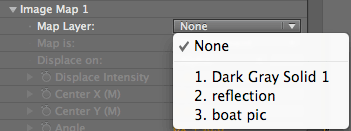
Map Layer pop-up shows the available layers in your composition.
Map Is pop-up
Lets you choose how your Image Map will be used in your scene. There are seven options described on this page.
Displace On pop-up
Lets you choose which component of the color and luminance information in your Image Map will be used to generate the displacement. Displacement mapping with different channels of a full color image can give widely varying results. It's a good idea to experiment with the Displace On options when testing a displacement map.
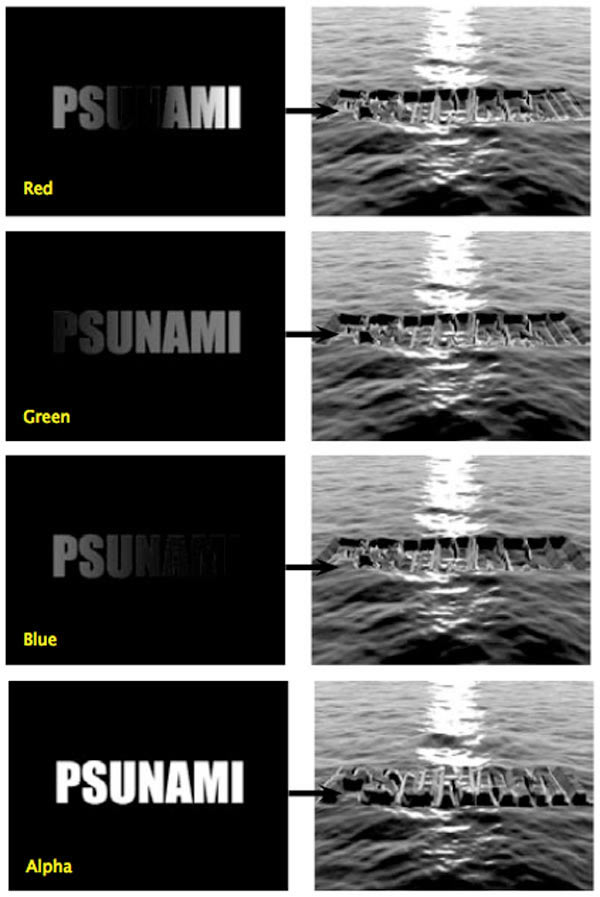
How it Works: Displacement mapping in Psunami is based on a range of 0-255 values of grayscale. Since each channel in an image in After Effects contains a full range of 256 values, only one channel of your image can be used for displacement. Use Displace On to set which channel of your Image Map will be used for displacement.
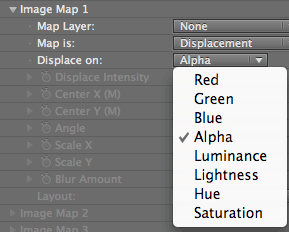
There are four color channel options: Red, Green, Blue and Alpha. Red, Green, and Blue rarely produce positive displacement. In most cases, you'll get the best results from the Alpha, Luminance or Lightness options.
Psunami always uses the transparency information in your image's alpha channel when displacing on color channels. In our examples below, we have an image of text with a white alpha in the shape of the text and the rest of the alpha black. Psunami will knock out the background of the image before extracting the selected channel for displacement. If there isn't an alpha channel in the image, then the black background would render as a flat depressed area around the text.
There are four color system options: Luminance, Hue, Lightness and Saturation.
Luminance is the brightness component of your Image Map. Psunami calculates the luminance value of a pixel by averaging the three red, green and blue values of the pixel together to generate the brightness of the pixel. Lightness is similar to luminance, but is generated using a different method; the Lightness value of a pixel is calculated by finding the average value between the brightest and darkest of the three color values in the pixel.
HLS, or the Hue/Lightness/Saturation color system, defines color as a position on a color wheel. Hue is the angle of the position of the color point on the wheel relative to 0 degrees. HLS defines saturation as the linear distance of a point on the color wheel from the center of the wheel. Hue and Saturation generally do not produce satisfactory displacement mapping.
In most cases, you'll get the best results from the Alpha, Luminance, or Lightness options. You can view the Luminance, Hue, Lightness and Saturation components in Render Mode> Grayscale (Icons).
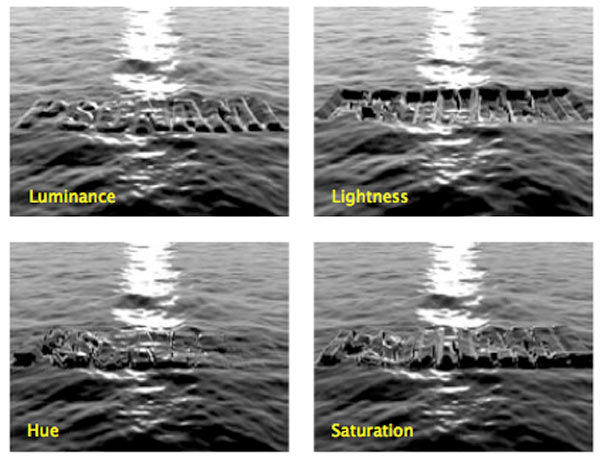
Displace Intensity
Sets the amount of displacement your map will produce. A value of 0 causes no displacement; higher displacement values will produce a higher average displacement. Negative displacement values invert the normal displacement order, so that Light pixels push the mesh down and dark pixels push the mesh up. You can animate this value to have a logo rise out the sea, for example.

Displacing the alpha channel with Displace + Texture On Image Map. Left to right, Displace Intensity at 2, 10 and –5.
Center X (M), Center Y (M)
Sets the position of your Image Map, in meters, on the ocean surface, relative to the center of the ocean grayscale map seen in the Grayscale Render Modes. When you're looking at the ocean surface in Grayscale (Icons) Render Mode, the Image Map's X position is along the left/right axis, and the Y position is along the up/down axis.
Center X and Y values are relative to the center of the grayscale image. Positive X values will position your Image Map to the right or east of the center of the grayscale image. Negative X values will position your Image Map to the left or west of the center of the grayscale image. Positive Y values will position your Image Map above or to the north of the center of the grayscale layer. Negative Y values will position your Image Map below or to the south of the center of the grayscale layer.
To get an idea of how these Center values correspond to position in Psunami's world, you should understand that one pixel equals one meter in the Grayscale Render Modes. Therefore, a 320 by 240 composition has a visible grayscale area of 320 by 240 meters. For example, setting the Center X value to 160 will position the center of your Image Map right on the edge of the grayscale frame.
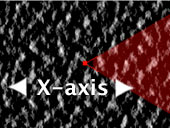
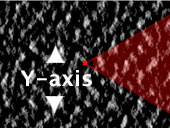
How the X position and Y position are constructed in Psunami.
Angle
Sets the rotation, in degrees, of your Image Map relative to the grayscale plane. Rotation occurs around the center of the Image Map.
An angle of 0 will align the Image Map with the left/right orientation of the ocean surface as seen in the Grayscale Render Modes (below left). With the default Camera settings, an Angle of 0 aligns the image along the camera's view axis (below right). Positive angle values rotate the Image Map clockwise; negative values rotate the image counterclockwise.
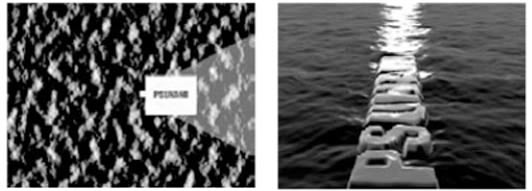
Left to right, Angle at 0 displayed in Grayscale Mode and Texture (No Geometry).
Scale X, Scale Y
Scales your Image Map relative to the grayscale ocean plane. Scale X and Y values of 1 will leave your Image Map at its original size relative to the grayscale map.
For instance, an Image Map of 320 by 240 pixels in a 320 by 240 comp will be at the same size as the comp with Scale X and Y both set to 1. It's possible i to scale your Image Map to significantly larger than its original size without artifacting.
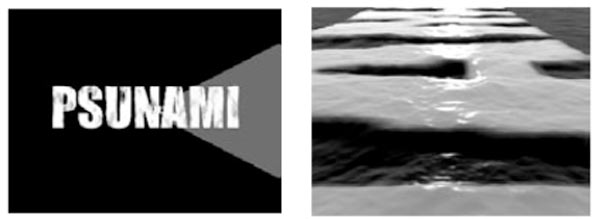
Left to right, Scale X/Y at 1 and 15.
Blur Amount
Lets you soften the Image Map. Blur Amount blurs the displacement alpha and texture RGB channels at the same time, which causes the Image Map to smear over the geometry. This is especially useful when images are used as displacement maps. Softening the displacement map with Blur Amount has the effect of reducing the sharpness of the displaced geometry.
Higher values give you more blur, which in turn decreases the contrast between adjacent pixels.
After Effects Note: Psunami's built-in blur is much higher-resolution than the blur filters that are built into After Effects. If you need to blur an Image Map, you will get better results by using Psunami's blur, rather than blurring the Image Map in a pre-comp.

Left to right, Blur Amount at 0, 5, and with two Image Maps.
Layout pop-up
Sets how your Image Map will be mapped to your ocean surface.

There are three Layout options:
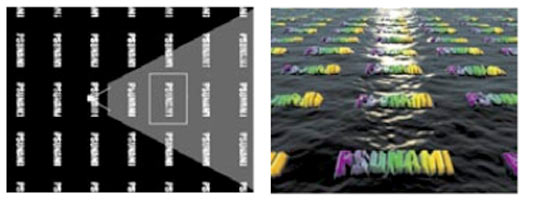
Left to right, Tile option shown in Grayscale (Icons) and Realistic mode.