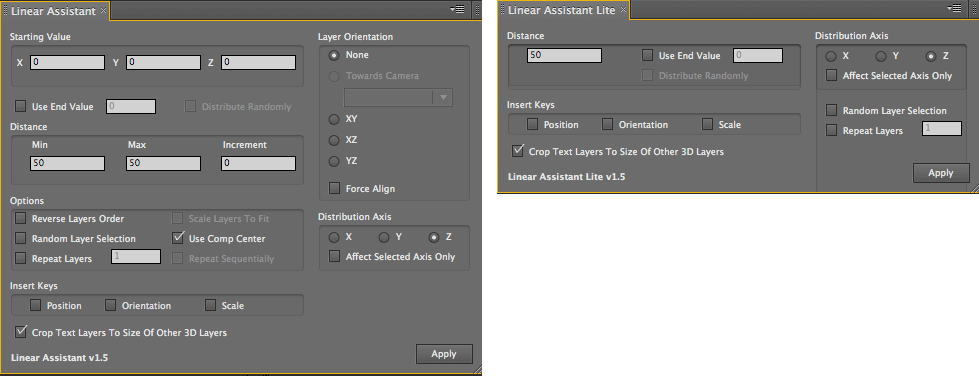
Distribution Assistants: Linear Assistant
The Linear Assistant is used for distributing layers in a straight line on the X, Y or Z-axis of a composition. There are controls to alter the position and orientation of the layers.
How it Works: Select the 3D layers in your composition that you wish to distribute in a line, and go to Window>Linear Assistant or Lite.
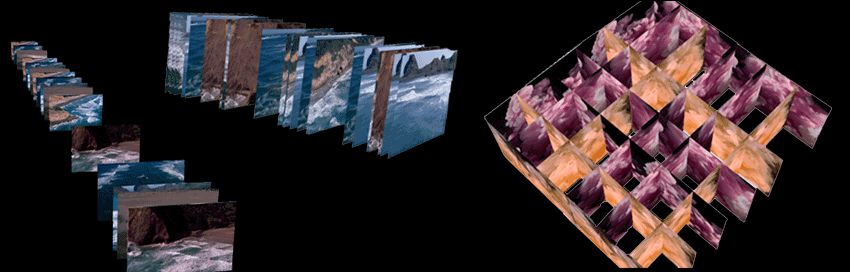
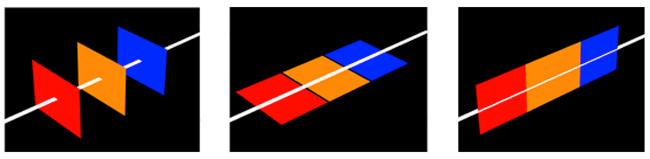
At left, layers distributed along X, Y and Z axes. In center, layers distributed along X and Y axes.
At right, one set of layers along the Z axis facing the XY plane, and another set along the X axis facing the YZ plane.
Starting Value
The point in 3D space where Linear Assistant will begin distributing your layers.
See Distribution Assistants, Common Parameters
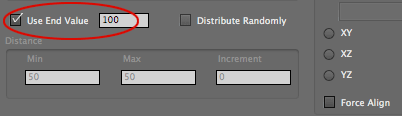
Use End Value checkbox
Distributes layers within a finite distance in space. Turned off by default. Turn on the checkbox and enter a value for the pixel-based distance that your layers will cover. For example, entering a value of 500 will cause your layers to be distributed evenly across a 500-pixel distance in your composition.
NOTE: When Use End Value is active, the Distance settings are disabled and grayed out.
Distribute Randomly checkbox
If this checkbox is selected, Linear Assistant takes all the layers and positions them randomly within the selected area.
See Distribution Assistants, Common Parameters
Distance group
Distance determines how far apart the layers will be distributed along the plane. These parameters behave similar to Distance in Planar Assistant and Cubic Distribution, except Linear Assistant can distribute layers in one dimension.
See Distribution Assistants, Common Parameters

Layers Orientation group
Determines what axis the layers are oriented around.
See Distribution Assistants, Common Parameters
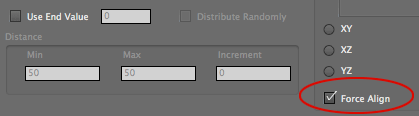
Force Align checkbox
If this checkbox is selected, Linear Assistant will arrange your layers edge to edge along the chosen Distribution Axis (see below). Turned off by default.
The result of Force Align depends heavily on the orientation of the layers. Since layers in After Effects are flat and can’t scale along their Z-axis, for Force Align to work, the layers cannot be oriented with their axis going straight through their center point.
NOTE: Force Align is required if you are using the Scale Layers To Fit checkbox (see below).
NOTE: When Force Align is active, the Distance settings are disabled and grayed out.
At left, layers oriented on XY plane, distributed on Z-axis, without Force Align.
In middle, layers oriented on XZ plane, distributed on Z-axis, without Force Align. Notice the gaps between the layers.
At right, layers oriented on YZ plane, distributed on Z-axis, with Force Align. There is no space between the layers.
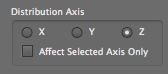
Distribution Axis group
Three buttons that set the axis on which Linear Assistant will distribute your layers. Layers are placed along that axis starting at the location set by the Starting Value. Layers will then be placed further along the axis by the values set in the Distance group.
The layers are placed based on their position in the Timeline. The layer at the top of the stack in the Timeline will be placed first. It is followed by the layer in the second position, then the layer in the third position, and so on.
NOTE: If Reverse Layer Order checkbox is selected, the layers are selected from the bottom up. The bottom layer becomes the first layer placed, then the layer above that, etc.
NOTE: If Select Layers Randomly checkbox is selected, the layer order will be ignored and layers are selected randomly when placed.
![]()
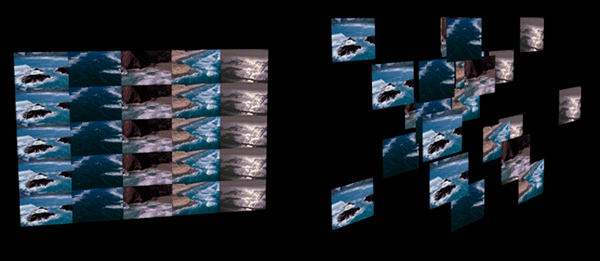
At left, layers distributed evenly along Z-axis. At right, layers distributed unevenly along the Z-axis.
Affected Selected Axis Only checkbox
If this checkbox is selected, when Linear Assistant re-positions the layers, the layers will ONLY be re-positioned on the selected axis. Turned off by default.
This can be very useful in a number of situations. Let’s say you create a wall of images, for example, and want them to start all over the Z-axis and eventually fly together. You can set up your final position with the Matrix Creator and set keyframes. Then move to the beginning of the Timeline and use the Linear Assistant to randomly place the layers along the Z axis.
Insert Keys group
Three checkboxes that specify which layer properties will have a keyframe set for them: Position, Rotation and/or Scale.
See Distribution Assistants, Common Parameters
Options> Use Comp Center checkbox
If this checkbox is selected, the Starting Point is ignored and the Comp Center sets the position of the first layer. This behavior for Linear Assistant is different than all other PlaneSpace assistants.
See also: Distribution Assistants, Common Parameters
Options> Scale Layers to Fit checkbox
Scales your layers up or down so that they fit within the defined start and end values.
NOTE: Active when Use End Value (see above) and Force Align (see above) are selected.
See Distribution Assistants, Common Parameters
Options> Reverse Layers Order checkbox
Options> Random Layer Selection checkbox
Options> Repeat Layers checkbox
Options> Repeat Sequentially checkbox
Crop Text Layers to Size of Other 3D Layers checkbox
See Distribution Assistants, Common Parameters