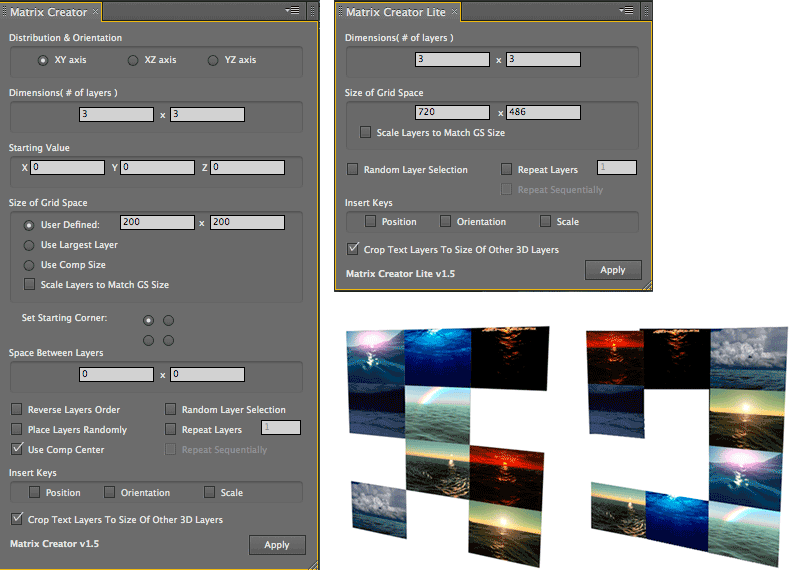
Creator Assistants: Matrix Creator
Matrix Creator specializes in creating a grid or wall of images, also called a 'matrix'. It is similar in functionality to the Planar Assistant, but Matrix Creator is your best tool if the desired result is a uniform wall of images. It has specific controls and options relating to this particular use.
How it Works: Select the 3D layers in your composition that you wish to distribute in a matrix arrangement, and go to Window> Matrix Creator or Lite.

Distribution & Orientation buttons
Dictates which 2D plane the matrix will be created in, as well as the orientation of the layers in the matrix. All the layers are placed in the grid spaces -- or cells, or whatever you wish to call the intersection of rows and columns -- and they must take on the orientation of the grid space.
Unlike the Planar Assistant, there is no option to have the layers oriented in a different plane than the plane they are being distributed in. For example, if you want the layers to lay flat, you choose the XZ Axis.

![]()

Dimensions (# of layers)
Represents the dimensions of the matrix as its number of columns and rows, similar to the way you set a spreadsheet. This does not define how large the grid is; that's done by Size of Grid Space (see below).

Starting Value
Sets the point in space where the first layer in the matrix will be distributed. This parameter has a direct influence on the Set Starting Corner parameter (see below).
See Creator Assistants, Common Parameters
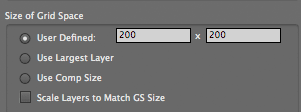
Size of Grid Space
Defines the grid space used to create a matrix. This is a particularly important parameter because it basically sets the size of the grid.
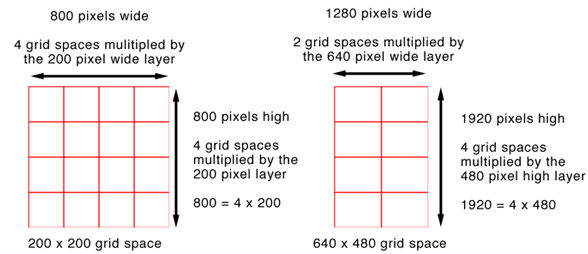
Size of Grid Space is always defined by an X and Y value. The X value will be multiplied by the number of columns and the Y value will be multiplied by the number of rows.
The options for setting the grid space size are:
If the grid spaces are too big, the layers will have space around them. If the grid space isn’t large enough, the layers will overlap the edges and overlap into other grid spaces. In the case of layers overlapping, sometimes this is very desirable. After Effects' 3D renderer will sometimes render a seam between layers even though they are perfectly aligned. This ‘seam’ can be eliminated by having the layers overlap slightly. You can generally solve the problem by making the Size of Grid Space a few pixels smaller than your layers.


Scale Layers To Match GS Size checkbox
Causes each layer to be scaled so it matches Size of Grid Space. For example, if you select ten 50x50 pixel layers to distribute into a matrix, and you set Size of Grid Space to 100x100, each layer in your matrix will be scaled 200% to match the Grid Space dimensions. Turned off by default.
This checkbox works great if you have layers with differing sizes and you want to re-size them all into a specific size. It is also helpful when using the Size of Grid Space> Use Largest Layer option. It uses After Effects' built-in scaling, which can sometimes leave a bit to be desired. However, you can use this to determine the amount that it needs to be scaled by, and if you’re unhappy with the results, use a different filter or program to do the scaling.
Of course, any time you start scaling images, you run the risk of distortion, pixelization and blurriness. You should check your layers after scaling to make sure the images look okay.
Set Starting Corner
Starting Corner is the corner of the matrix where the first layer will be distributed. This first positioning will determine how the other layers are arranged. This is particularly important if there are fewer layers than grid spaces.
The diagram below explains the order in which all the layers are placed, depending upon which corner of the layer is selected. The label '1' indicates the top-most layer which is placed first. The second layer is ‘2’, and so on. The first layer that gets positioned always uses the Starting Value (see above). So if you change from the upper-left Starting Corner to the upper-right, the matrix will appear to flip sides, in addition to the layers being placed differently.
NOTE: The Place Layers Randomly checkbox (see below) will cause this section to be ignored completely.
This order of positioning will reverse if the Reverse Order Selection checkbox is selected. If the Random Layer Selection checkbox is selected, the layer order is ignored completely, but the layers will still be placed according to the Starting Corner selected and the layout in the illustration above.


This chart shows how the layers are placed. The top layer in the Timeline is ‘1’, the second layer is ‘2’, and so on.
Space Between Layers
This setting determines the vertical and horizontal space between the layers in the matrix. The space between layers is calculated after the size of grid space settings, so it is possible to have space between the layers in your matrix even if you select Scale Layers To Match Grid Size.

![]()

At left, Space Between Layers at 0, so image has no space between the layers. At right, Space Between Layers at 40 pixels of space.
Insert Keys group
Three checkboxes that specify which layer properties will have a keyframe set for them: Position, Rotation and/or Scale.
See Creator Assistants, Common Parameters
Place Layers Randomly checkbox
Normally, layers are placed sequentially based on Starting Corner. If Place Layers Randomly is active, then layers are randomly placed throughout the grid. Turned off by default.
For example, if you have 20 layers and 30 grid spaces available, the layers will typically occupy the first 20 grid spaces at the top of the grid. If Place Layers Randomly is selected, the 20 layers are randomly placed among the 30 grid spaces. This results in a ‘tic tac toe’ board effect, with empty spaces throughout the grid.
With this checkbox, you will get a different result each time you click Apply for Matrix Creator. By using hold keyframes, it’s really easy to animate layers arranging and re-arranging. You can easily create a ‘TV Wall’ that will flash images or have the images move around.

At left, a normal grid with the layers placed sequentially. At right, Place Layers Randomly creates a less orderly grid.
Reverse Layers Order checkbox
Random Layer Selection checkbox
Use Comp Center checkbox
Repeat Layers checkbox
Repeat Sequentially checkbox
Crop Text Layers to Size of Other 3D Layers checkbox
See also: Creator Assistants, Common Parameters