
Quickstart for RG Reflection plug-in
Welcome to a quick introduction to the RG Reflection plug-in. This Quickstart uses screenshots and language from After Effects but its operation in other host applications is almost the same.
RG Reflection is a fun tool that creates a mirror-like reflection that can help to set off titles or other overlay graphics. You probably already understand the basics of casting a reflection. Light comes in from a single direction and is reflected in a single outgoing direction. A mirror-like image is cast from the object that is in the path of the light, and that reflection spreads out in a direction away from the light source. If the light is close to the source object, then the reflection is short in length. The further away the light is from the object, the longer the reflection will be.
Here is what happens when the Reflection plug-in renders a reflection. The reflection is a polygon that is defined by the boundaries of the source layer. Your polygon is created, then the boundaries of the layer are blurred and stretched and otherwise transformed. If there is an alpha channel in the source image, that alpha is respected. All of the controls in the Reflection plug-in serve the purpose of making the reflection more realistic or simply making it blend into the scene better. So let's get started!
Step 1: The setup
First, let's setup a scene for our reflection. Here you have a title graphic placed over a gradient background. To make the text look grounded, you will use RG Reflection to create a simple mirror reflection that matches the ground plane. We will add softness and fade to create the look of a diffuse surface.
With the Text layer selected, apply the plug-in from the Effect> Red Giant Warp> RG Reflection menu. Go to the Effect Controls palette.

Our initial scene with just text and a background gradient.
Step 2: Change the Baseline and Height and Slant controls
The first thing that we will see when applying the Reflection plug-in is that the reflection is misplaced. This will not happen all of the time, but our tutorial's source object is the same size as the overall project size, and the shadow needs to be aligned properly with the Science text's baseline.

Default shadow applied to the image. The yellow line at the bottom are the points that define the shadow plane.
To adjust Reflection to match, we need to set its position with the 3D Transform group . There are three points: Baseline Start, Baseline End and Height/Slant. Drag the points to match the base of the characters or (except in FCP) you can drag the bar itself to set the Baseline start and end simultaneously. Since the Height and Slant is already pointing straight down, you don't need to change the position of this point.

The controls in position with the reflection looking as expected.
Step 3: Adjust the Reflection Softness
Once the position is set, you need to adjust the softness controls to make the reflection look more diffuse. A real-world mirror does not have perfect reflectance. Adding a bit of softness will increase the realism.
There are three Softness parameters in the Reflection Style group. Softness controls the blur value along the reflection. This control affects the entire reflection, though you mostly notice it more around the edges. Let's change the Softness to 100 so the reflection looks more blurred. And you will also set the Softness Aspect to 0.5. These two values will generate a diffuse reflection that gets softer parallel to the baseline, increasing in softness at the edge opposite the baseline.

![]()

At left, Softness at 100, Softness Aspect at 0.5 so the reflection looks diffuse. At right, the Reflect Style> Softness controls.
Step 4: Adjust the Fade Start and Length
Let's keep the Softness Fade on Progressive Linear. Speaking of fade, let's set the two Fade controls.
Fade Start controls where the reflection begins to fade. It is measured as a percentage of the height of the source image. At the default of 0, the fade starts at the baseline of the reflection. At 100, the fade starts at the top of the reflection. If the fade starts farther into the reflection, the whole reflection will be more distinct and opaque. For our reflection, you should set the Fade Length to 30 and set the Fade Type to Square—this will create a more prominent fade.

![]()

At left, Fade Length at 30, Fade Start at Square. At right, the Reflect Style> Fade controls.
Step 5: Adjust the Reflection Opacity
To make the reflection blend into the background, adjust the Reflection Opacity control to 62. This will decrease the reflection opacity by 25% and blend it subtly into the background gradient.

Reflection Opacity value set to 62.
In conclusion
Your Reflection is now ready to animate! When using the Reflection plug-in, you will almost always go to the 3D Transform group as your first steps to set up the reflection axis. However, keep in mind that you don't have to change the controls in the order we have just shown.
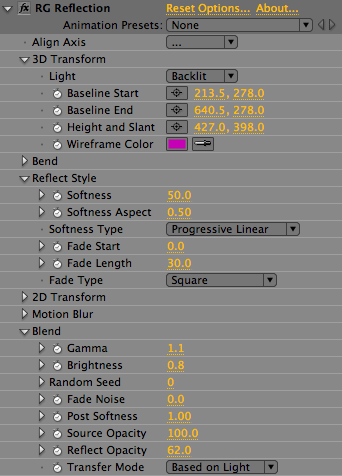
The final settings used for our Reflection.