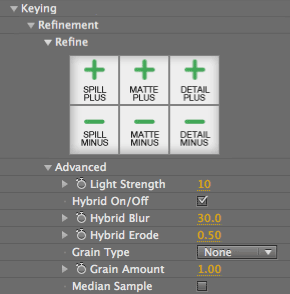
Keying> Refinement group
The Refinement group lets you reduce or recover the amount of spill color, matte density and level of preserved detail. There is a new Advanced section with Hybrid tools that maintain clean matte edges, and Grain tools that clean up noisy grain.
Refine> Spill Plus, Spill Minus
These tools gradually remove or recover the spill intensity on the foreground object through repeated sampling of the color region. Spill Plus/Minus let you sample the same pixel multiple times as needed and its effect is increased with each click of the mouse. Compare this to the Spill Sponge tool, which removes the entire spill in a single click and does not allow subsequent adjustment.
To use Spill Plus/Minus, zoom into an area of the foreground which has blue spill on the edges of the element. Select Spill Plus to decrease the amount of spill removal. Select Spill Minus to increase spill removal. Then click on an area with spill. The visible effects of these tools are extremely subtle, so multiple clicks will most likely be required. Repeated clicking will incrementally remove the spill from the foreground, so continue sampling until the desired result is achieved.

Refine> Matte Plus, Matte Minus
These tools are used to thicken or reduce the matte information. For instance, if you want a thinner shadow on a foreground object, use Matte Minus to make it more transparent. Use the Matte Plus tool to make the matte thicker in that color region.
To use Matte Plus/Minus, zoom into an area of the foreground that is more opaque or transparent than you would like it to be. Select Matte Plus to decrease the transparency. Select Matte Minus to increase the transparency. Then click on an area that you want to modify. The visible effects of these tools are extremely subtle, so multiple clicks will most likely be required. Repeated clicking will incrementally adjust the transparency of the color region you are clicking on, so continue sampling until the desired result is achieved.

Refine> Detail Plus, Detail Minus
These tools give a refined version of the Clean BG tool (in Keying> Select group) and Restore Detail tool (in Keying> Correct group). For instance, if you see noise in the semi-transparent areas of the foreground, try using the Detail Minus tool to suppress it. It will reduce the thickness of the noise gradually; you should stop the sampling when important fine details start to disappear.
To use Detail Plus/Minus, zoom into an area of the foreground where some detail has been lost. Select Detail Plus to bring back lost detail. Select Detail Minus to remove detail. Then click on a region that you want to modify. The visible effects of these tools are extremely subtle, so multiple clicks will most likely be required. Repeated clicking will incrementally bring the lost detail back into view, so continue sampling until the desired result is achieved.

Light Strength
Light Strength controls how broadly Adjust Light will apply its effect. This slider works with the Adjust Light checkbox and is a very subtle adjustment.
Hybrid On/Off checkbox
This checkbox activates the Hybrid controls. Turned off by default.
The purpose of using Hybrid is to clean up transparency in the foreground while still maintaining good solid edges. There may be unintentional transparency areas in the foreground because of foreground color that is similar to the screen color. The result of using Hybrid is that your matte has cleaner edges while still maintaining the subject definition. For instance, Hybrid helps to retain your subject edges even if the subject is wearing clothing similar to the background that is being keyed.
How it works: Behind the scenes, the three Hybrid controls create two keys, an outer 'edge' key and an inner 'body' key, and then combines them. The result that you see is that Hybrid creates cleaner edges while maintaining your subject. This is a compositing technique commonly done manually by artists to deal with tricky keys. It produces good edge results without comprising the inner part of the matte and creating holes.
What is a 'hole'? Sometimes an area of the foreground object will be keyed out to transparency. If the foreground contains a color that is close to the back screen color, during the color removal, the edge of the foreground object picks up a color fringe. It is very hard to remove the fringe without sacrificing quality somewhere else on the image. The Hybrid operation is optimized to get the best edge around the foreground object without any fringe effect.
How to use Hybrid: First, key the foreground area using the Select BG button or Auto Compute button. Checkmark the Hybrid On/Off button and choose the Clean BG button. Sample the transparent area. The Hybrid mode will internally perform its double ‘body/edge’ operation. This results in a final composite with good edges around the foreground object while still preserving the area within the foreground object that was transparent.
Hybrid Matte View: You can clearly see what Hybrid does by turning on Keying> View> Hybrid Matte in the View pop-up.

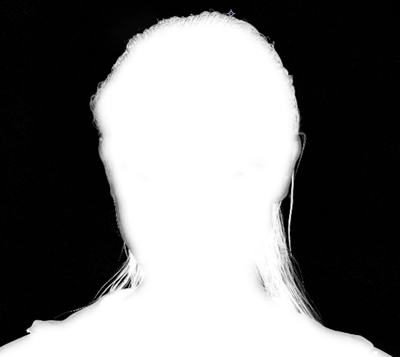
Left to right, Hybrid turned on and off, shown in Matte View.
Hybrid Blur
Adjusts the amount of blur applied to the Hybrid matte. Blur will soften the edges. This can make the edges more transparent, which is helpful if you have semi-transparency like wispy hair.
Hybrid Erode
Adjusts the amount of erosion applied to the Hybrid matte. At high values, Erode takes the edges away and shrinks the matte inward to create a solid interior.
Grain Type pop-up
The Grain controls will help clean up noise while keeping a good edge on the matte. If you have a noisy image, you will find that the matte is also noisy. When the background screen noise is completely removed from a grainy image, the edges of the foreground object often become harsh and jagged, which creates a poor key. Use the Grain tools when a foreground image is highly compromised by film grain. You can use Clean BG to remove noisy pixels, but this may negatively modify the edge of the foreground object.
PRIMATTE 4.0 NOTE: The Grain tools were formerly in the Correction section.
How to use Grain tools: First, key the foreground area using the Select BG button or Auto Compute button. Next, use Clean BG to remove a small amount of the white noise in Matte View; use it sparingly so there is a minimum change to the edge of the foreground object. Then select Grain Type and choose Small as a first step to reduce the grain. This should increase the effect of Clean BG without changing the foreground edges. If the grain is still present, try increasing the Grain Amount a little. If grain is still present, try changing the Grain Type to Medium or Large and also increasing the Grain Amount.
Grain Type gives you a range of grain removal from Small to Large.
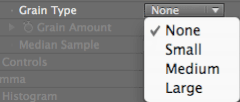
• None: Uses the color of the exact pixel sampled.
• Small: Uses the average color of a small region of the area around the sampled pixel. Use when the grain is very dense.
• Medium: Uses the average color of a medium-sized region of the area around the sampled pixel. Use when the grain is less dense.
• Large: Uses the average color of a larger region of the area around the sampled pixel. Use when the grain is very loose.
Grain Amount
Adjusts the effect of the Clean BG tool without changing the edge of the foreground object. Sometimes setting the Grain Type may not be enough to totally remove the grain. By adjusting the Grain Amount, you can tell Primatte what pixel brightness it should recognize as grain. Try not to use too high of a value or it will affect the overall matte.


At left, the image is noisy. At right, an over-adjusted image.
Median Sample checkbox
If this is checkmarked, when you click a pixel, the Grain Amount will do a median filter of that pixel and the eight surrounding pixels. This is a common technique to remove noisy pixels and keep noise out of of the Grain sample.