RG Shadow plug-in: Blend group
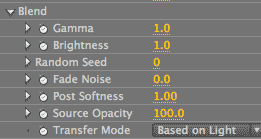
The Blend group controls how the shadow gets blended into the background, mostly through noise and brightness controls. There are also settings, such as blend modes, that affect what the source image looks like. We've tried to anticipate every feature that a compositor could possibly need. Some of the Shadow controls are options that you may never use... until you're in the middle of a big project and need to get that shadow just right.

Blend> Gamma
Gamma compresses the brightness values in the shadow, giving you control over the midpoint or gray level. It allows you to compress or expand/stretch the values in the mid ranges. The range of value is 0.1 to 10, and the default is 1.
Since the shadow is always a single color, Gamma doesn't work the way gamma controls typically work. (For that functionality, see Blend> Gamma for the Reflection plug-in.) Gamma will have the visual effect of slightly lightening or darkening the shadow. Values below 1 will lighten the shadow. Values above 1 will make the shadow look darker. If the shadow has some RGB value to it, as in our red example below, then you will see a color shift along with the brightness and darkness. If the shadow color is true black (R/0, G/0, B/0) then you will only see a light/dark shift.


Left to right: The Shadow Color used. Gamma at 0.5. Gamma at 1 (the default).


Left to right: Gamma at 3. Gamma at 5.
Blend> Brightness
Brightness affects the shadow color. This control is not to be confused with a control that generates contrast or brightness/dullness. Our Brightness is actually a 'gain' control. This means that Brightness will compress or expand/stretch the RGB values in the shadow. The range of value is 0 to 10, and the default is 1.
If the shadow color is true black (R/0, G/0, B/0) then Brightness will have no effect on the shadow. You will not see a tonal shift by changing the Brightness value. This is because there isn't a color value to use as an input. Once an RGB value is added to the Shadow Color, then you will see Brightness affect the shadow.
In our example below, the Shadow Color selected is a deep red. Below a Brightness of 1, the shadow color stays dark because the values are compressed. As the Brightness value goes above 1, the shadow expands the value range and takes on more of the red hue. This is because gain tends to multiply the highlights of an image -- in this case, a single color shadow -- giving it a saturated and intensified look.


Left to right: The Shadow Color used. Brightness at 0.1. Brightness at 1 (the default).


Left to right: Brightness at 5. Brightness at 10.
Brightness is also affected by the Shadow Look> Opacity control. Opacity tends to reduce the overall brightness of the shadow as it reduces its opaqueness. Brightness is applied after Opacity because of where it sits in the control list, so this means the gain intensity is applied over the transparency characteristic.
Blend> Random Seed
Random Seed controls the kernel used for the fractal noise that is used to render the shadow. The noise pattern helps to eliminate banding in the shadow. This can occur, for instance, if the shadow has an exaggerated Height/Slant angle or a lot of Softness blur applied. If you change Random Seed, you will change the pattern of the noise.
Blend> Fade Noise
Speaking of noise... The Fade Noise feature adds noise specifically to the fadeout areas of the shadow. This hides any contouring or banding in the image and helps you to control what the shadow's fadeout looks like. The value range is 0 to 10, and the default is 1.
If you really exaggerate the slant of the shadow, you will get some banding. That's why we added Fade Noise. Increase Fade Noise to 100, perhaps, and that will smooth out the banding. This is a post feature to make sure you are getting something visually pleasing, similar to using After Effects' Scatter or Noise filters, but built into the Shadow plug-in. The benefit of using this control is that noise is introduced only into the shadow polygon, not into its source image.

Fade Noise at 75. This is a difficult control to show because the effects of Fade Noise do not look very good close up! Viewed here at 400%, our example shows fractal noise introduced into the shadow but not the source image. Seen from a 100% view, the noise smoothes out unwanted banding in the shadow.
Blend> Post Softness
Post Softness softens or blurs the noise so it doesn't look as pronounced. This control does not blur or soften the shadow. Instead it affects how the noise is applied to that alpha. The value range is 0 to 10, and the default is 1. If Post Softness is set to 0, there will be a tiny bit of pixel-based noise. Turn Post Softness all the way up and the noise will be completely blurred out. At a low value like 2, you get little pixel 'dimples'. We wanted to make certain that people had the ability to add noise to the shadow, but didn't want the Fade Noise to create too digital of a look, so this setting gives a more film-like or natural look.

With Fade Noise still at 75 but Post Softness changed to 2, the noise is still present but smoother.
Blend> Source Opacity
Source Opacity controls the transparency level of the source layer from which the shadow is generating. This can create an interesting effect if you are trying to fade in or out the image but leave the shadow intact.


Left to right: Source Opacity at 50 and 80.
Blend> Transfer Mode
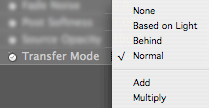
A transfer mode controls how the shadow blends with its source object by modifying their color values. The Transfer Modes are mostly standard options that work as expected, like Add adding and Overlay overlaying. The one exception in a mode called Based on Light.

Based on Light: The default mode. It allows the 3D Transform> Light control to work correctly. The choices for Light are Backlit and Frontlit. By default, the control is set to Frontlit. The Based on Light mode was created to make sure that if you change Light from Frontlit to Backlit, then you don't have to change the transfer mode as well.
If you set Light to Backlit, the shadow disappears behind the object even though the shadow is technically being drawn in front of the object. So what Backlit does in conjunction with Based on Light is to allow the shadow to fall in front of the source object. To do this, the source has to be overlaid by the shadow output it is generating.
Based on Light mode is pretty smart. It will look at the 3D Transform> Light value and determine where the shadow source is. Then it decides to put the shadow in front for the Backlit composite and behind for the Frontlit composite. All of the other modes, like Soft Light shown below, work as standard mode operations.

Frontlit (the default) and Based on Light (the default). The shadow is hidden behind the star, indicating that it is casting in front of the source object. This is typically the desired effect.


At left, Backlit and Based on Light. The shadow creates a darkened area against the star, indicating that it is casting in front of the source object.
At right, Backlit and Behind mode. The shadow looks like it's behind the star even though it is being cast in front. This is not the desired effect.


At left, Frontlit and Soft Light. The shadow composites as expected with the source image.
At right, Backlit and Soft Light. The shadow composites as expected with the source image.