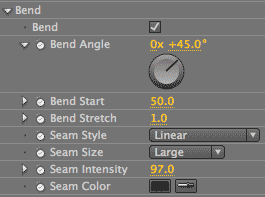
RG Reflection plug-in: Bend group
The Bend group is an interesting set of features that were built directly in response to customer requests. The Bend controls put a linear angle in the reflection, as if there is another plane that the reflection is falling onto in the distance. This 'fake bend' makes the reflection look as if it falls in one direction, then appears to hit a change in plane and cast in a new direction.
To create a reflection, the Reflection plug-in generates a polygon based on the alpha of the source image. To add a Bend to the reflection, the plug-in simply generates a second polygon.
With Bend, therefore, the reflection is casting onto a secondary plane as well as the first plane that is defined by the source object's Height. The limitation is that Bend is limited to a single plane. That is, you can only cast and bend the reflection onto one more plane than the source object is sitting on. There are many adjustments that you make to Bend, and we'll now explore those together.

Bend checkbox
This checkbox activates the Bend group of controls. When it is unchecked, the Bend controls are grayed out and unavailable.
Bend acts differently depending upon the 3D Transform> Light control (Frontlit or Backlit). Frontlit is the default option for Light. For Frontlit, the Bend shows immediately.
With the Backlit option, the Bend controls actually aren't logical. For Backlit, the shadow slants downwards by default, and realistically you wouldn't really have a second viewable plane for the Bend to cast upon. It's generally best to keep Bend turned off when Light> Backlit is chosen.
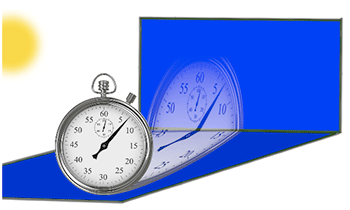
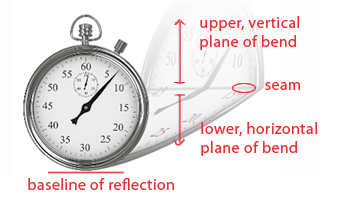
Light> Frontlit is chosen and the Bend group is active. The shadow falls behind the source object and the bend occurs where a wall might be.
Bend Angle
The main control in the Bend group. It controls the angle of the bend. There are two values for Bend Angle. One value keeps the two planes of the bend aligned together and is measured in degrees. The other value, Bend Angle Rotation, is explained below.
By default, Bend Angle is set at 45 degrees. If you set Bend Angle to 0, you will see a small seam that is created by the secondary polygon being drawn by the bend. However, you may not see any slant from the bend. If you raise the Bend Angle value, let's say to 45, the bend pulls that secondary plane to a more vertical stance. At 90 degrees, the reflection begins to tilt inwards.

Rotation wheel of Bend Angle
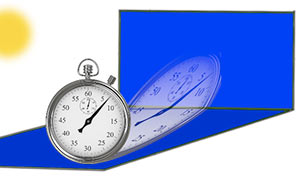
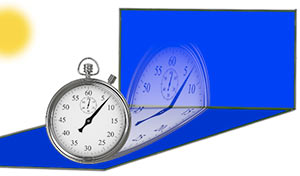
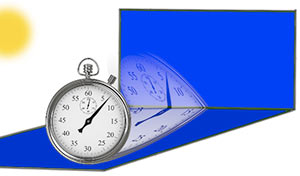
Left to right: Bend Angle at 20, 45 (default) and 80.
Therefore, at lower values, Bend Angle can set the plane to be completely level with the original ground. At higher values, it can pull the plane into for a different perspective. Bend Angle doesn't necessarily translate into a realistic scene, but it can lead to a lot of interesting graphical treatments.
At negative values, like -30, the bend gets a little strange depending upon where it's bending from. This can create something useful like a reflection rolling around a book page. More often, it creates unusable and weird effects, so you will generally stay in positive values.
Bend Angle Rotation
Allows the reflection's bend to rotate. This is an animation control that works alongside Bend Angle. You can use Rotation to swing the bend around and around itself.
Let's say a character is swinging an object and the reflection needs to swing around and follow the object's path. To twirl the reflection, you could animate the Bend Angle Rotation multiple times around its access, then animate the 3D Transform> Height/Slant point to match up.

Bend Start
Tells the reflection's bend where it breaks across the two planes. The default value is 50, and it's measured as a percentage of the reflection's length. The behavior of Bend Start is affected by Softness, Opacity, and a few other settings.
The reflection's bend starts along the baseline or the plane on which the source object is sitting. If you put Bend Start to a value of 0, then you're not going to see any Bend because its start point is off the reflection length. A low value means the going to start very far away from the baseline. At 10 or even 40, depending upon the length of the reflection, we don't see much of the bend. At 50 or 60, we will definitely see the bend.
The greater the value of Bend Start, the closer it is to the original start point. If we set Bend Start to 100, the reflection is going to bend at the start of the baseline that it sits at. At a value of 80, the bend is still close to the baseline but we can distinguish it from the source object.



Left to right, Bend Start at 70, 80 and 90. At lower values, the bend starts higher up shadow and eventually is not viewable. At higher values, the bend starts closer to the source object's baseline.
Bend Stretch
A secondary control that allows you to stretch out the Bend. Think of the bend as being made of two planes: the lower horizontal and the upper vertical. Bend Stretch changes the length of the upper horizontal plane. Something to note is that the Stretch does not set the perspective of the crease. The default value is 1 and it's measured as a percentage of the shadow's length.
At 0.1, the secondary plane is very small, almost undetectable, depending upon the source image. As the value gets bigger, moving to its maximum of 1, the upper plane will continue to stretch vertically from where that bend is defined. The plane below the bend is not affected. Bend Stretch should generally be kept at a small value. In fact, you can typically leave the setting at its default of 1.

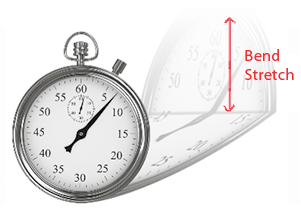

Left to right: Bend Stretch at 0.5, 1 (default) and 2. As the value gets higher, the upper plane of the bend gets longer.
Something to note is that the upper and lower parts of the bend don't split evenly. If you have a Bend Stretch value of 1, you will not get exactly a 50/50 split in the plane lengths. This is because we are factoring in an alpha channel around the source image, which then gets factored into the total height division. The middle may not be the exact 50% midway point, because your alpha channel might be extended slightly to compensate for cropping of the image.
As the secondary plane stretches, it may look a little feathered. This is because it is exaggerating the distance that part of the reflection has to cover, which makes the softness of the reflection more exaggerated. We have made certain that the Reflection plug-in uses a high-quality resampler. The reflection should be stretched in a way that doesn't look pixelated or create fine-line artifacts.
Seam controls
The three Seam controls affect the appearance of the seam that breaks the shadow's bend into two planes. Seam Style sets the thickness of the seam. Change the Seam Size, Seam Intensity and Seam Color to modify the seam's size, contrast and coloration. Read on for more explanation...
You often won't see much of an impact from seam controls unless you have Seam Size set to Medium or High and Seam Intensity set above 70. It's also helpful to have the Seam Color set to a bright color, if that works for your project.
Seam Style pop-up
Tells the seam how you want it to appear, and how it should layer into the reflection. This is a great way to exaggerate where that seam edge falls. Let's say that you want to create the appearance of a reflection casting onto a material roll. Where the reflection bends there is some thickness, and a banded roll instead of a precise, square 'cut' look.

There are four options:
Constant: Gives the seam a sharp edge.



Left to right: Seam Style at Constant, Square and Linear.
Seam Size pop-up
Seam Size lets you exaggerate where the seam point is. There are four options. The default option is Small. The higher the value, the more clearly you can see the seam of the image.
If Seam Size is set to None, then you will see a very tiny edge or NO edge in the reflection's bend. A value of Small, Medium or High will, respectively, exaggerate that edge by increasing its size.


Left to right: Seam Size at None, Small (the default) and Large.
Seam Intensity
Turning up the Seam Intensity makes the bend's seam look more bright and pronounced. You're basically cranking up the darkness/contrast to exaggerate how pronounced that part of the bend appears. The default is 50. You generally have to go to higher values to see a noticeable change.



Left to right: Seam Intensity at 20, 60 and 100.
Seam Color
This color property allows the seam to change its color. The default color is medium gray. This control adds a nice element of control to your effect, though you will probably keep Seam Color at a neutral value for anything realistic.
The color palette of the reflection and the color of its seam need to have some contrast for the seam to show. The Seam Intensity and Blend> Source Opacity will also affect the seam's visibility as both controls have an impact on brightness and contrast levels.


At left, Seam Color is white. At right, Seam Color is red.