What is PlaneSpace?
PlaneSpace was created because managing many 3D-enabled layers in After Effects can be a tedious process. While the 3D environment that After Effects gives you is terrific, After Effects doesn't give you many tools for arranging and managing the 3D layers. Once you get into managing 100 layers in 3D space... yikes. PlaneSpace allows you to easily manage your 3D layers and arrange them into various shapes, such as cubes, cylinders, rings and video walls. Go here for important tips about working in PlaneSpace.
Using keyframe assistants
PlaneSpace is a collection of keyframe assistants that function much like keyframe assistants that ship with After Effects. Because they are keyframe assistants, not plug-ins, there is no render time on top of the time it takes for After Effects to render your layers.
Unlike some other keyframe assistants, like The Wiggler, PlaneSpace tools do not need keyframes to be present in a layer in order to function. You can use PlaneSpace Assistants to set keyframes but mostly they are designed to arrange layers in 3D space. This doesn't require keyframes unless you want to animate the position or orientation of your layers.
There is no limit to the number of layers that you can simultaneously apply a PlaneSpace Assistant to. In fact, the ability to distribute large groups of layers is one of the most useful aspects of PlaneSpace. You can also use the Assistants to replicate your layers and create large groups of layers. You can easily turn 7 layers into 700 layers and manage them all.
After Effects' 3D Space
PlaneSpace Assistants integrate perfectly with the After Effects 3D environment. You can use the After Effects cameras to fly around your layers, and create other 3D layers that will interact in 3D space with the layers positioned by PlaneSpace.
You have to use PlaneSpace Assistants on 3D layers. If you try to use the PlaneSpace on a 2D layer, you will notice that PlaneSpace is grayed out and cannot be selected.
PlaneSpace gives you a very powerful and easy way of arranging 3D layers. You can arrange, re-arrange, re-position, and re-arrange again as much as you like. If you don't like a configuration, change a few parameters and re-adjust the layers. Or hit Undo to go back to your original layout.
All of the PlaneSpace conform to After Effects' 3D coordinate system. The origin of After Effects' 3D space (x=0, y=0, z=0) is always the upper left corner of the composition, regardless of the composition's size. All the assistants default to 0,0,0. Keep this in mind when inputting values into PlaneSpace to ensure your layers end up being distributed where you want them to be. It's very easy to change the center and that will be discussed once we get into the assistants, but if all your layers suddenly end up in the upper left corner, that's why.
How to access the Assistants
PlaneSpace tools are keyframe assistants, so they are accessed from After Effects' Window menu.
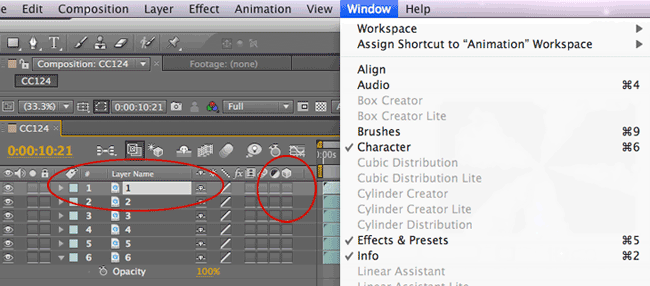
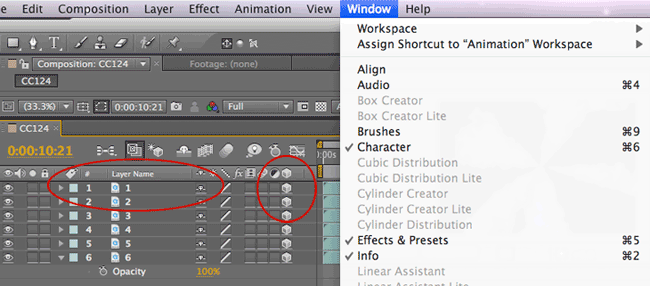
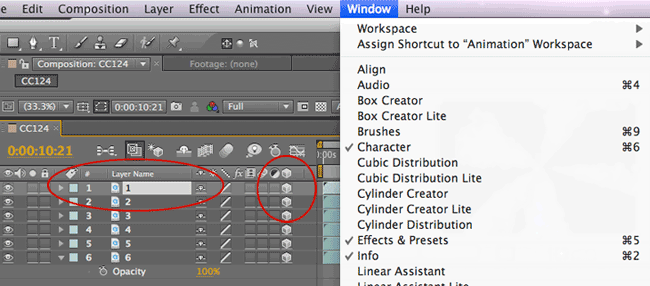
NOTE: The assistants will remain grayed out until at least one 3D-enabled layer is selected in your Timeline.

A layer is selected but it is not 3D-enabled. PlaneSpace is grayed out.

A layer is 3D-enabled but it is not selected. PlaneSpace is grayed out.

Success! A layer is selected and 3D-enabled, which makes PlaneSpace active.