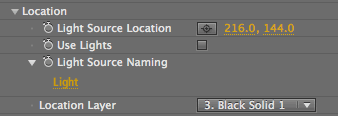

Location group
The Location group is a very important set of controls. Its controls affects the visibility of the lens flare, including where its light source is located and if that light source is turned on. If you are working in After Effects, you can use Location controls to recognize AE lights and change the behavior of related parameters. Let's read about them!


At left, Use Lights is off and Location Layer is loaded. At right, Use Lights is turned on.
Light Source Location
Light Source Location sets the position of the lens flare's light source in the X and Y axes.
The position of the light source can be controlled in a couple ways. You can numerically input the X and Y values. You can also change the values by moving the crosshair or point control in the Preview Window of your host application.
For the X axis, a low value moves the flare center to the left of the frame, while a high value moves the flare to the right. For the Y axis, a low value moves the flare center to the top of the frame, while a high value moves the flare to the bottom.
You can animate Light Source Location to place the center of the flare at a precise location on each frame. For example, you can keyframe the lens flare at its default location (pixel values 192, 144), and then at a new position of 448, 336.
NOTE: An alternate way to set the light source position is using the Location Layer pop-up to specify a source layer. The Use Lights checkbox will override your position with the current position of the light.
TIP: To control the Z position of your flare in After Effects, you can adjust the Z position of the After Effects light.
Use Lights checkbox (After Effects only)
This checkbox applies the Knoll lens flare to an After Effects light (or lights) in the scene. Turned off by default. Turn Use Lights on render a flare on each After Effects light in your Timeline.
When Use Lights is turned on, the Light Source Location grays out. You will instead use the Lens> Depth Scale controls to set the Z axis value.
NOTE: Use the Lens group to apply the After Effects light properties to a Knoll light.


At left, Use Lights is off. At right, Use Lights is on and points to AE lights named 'prettyflare'.
Light Source Naming, Light pop-up (After Effects only)
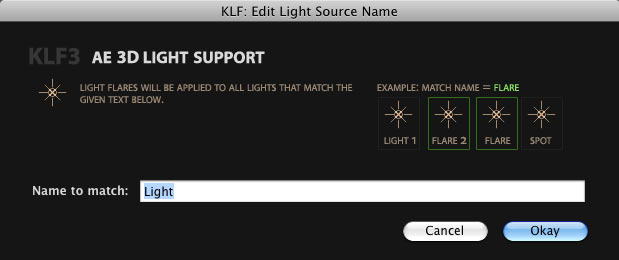
Click the Light field to bring up the Light Source Naming box. This dialog box controls which After Effects lights in a scene have a lens flare.
The Naming operation is very simple. Type a name into the text field. The AE lights in your Timeline with that name will take on the Knoll light properties. For example, if you type 'Bright' into the field, then AE lights named 'Bright 1', 'Super Bright' and 'Brightness 2' will all be affected.
You can always keep the default name of 'Light'. There is no limit on the number of lights that can be tied in. All lights that share the name will have the flare applied to it.

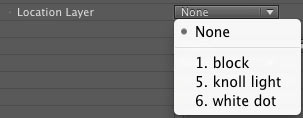
Location Layer pop-up
As an alternative to Light Source Location, the Location Layer is another way to set the light source position. Use this pop-up to choose a layer in your Timeline. Location Layer uses the alpha channel of this layer to set the position of the light source, and overrides the Light Source Location setting. The layer does not need to be visible in the Timeline to be used as a positioning layer.
How it works: Location Layer searches the alpha channel of the layer you select. It looks for non-black pixels and calculates the average position of these pixels. If you have a small white dot in a black alpha channel, the light effect will be placed at the center of the dot. If the alpha channel contains multiple white dots, the plug-in will average the positions of each dot and place the light at the averaged location. If no non-black pixels exist in the alpha channel, the light effect will default to the center of the image.
There are two Location Layer options.
