
Emitter group> Layer Emitter group
This parameter group lets you emit particles from layers. The Emitter Type Layer needs to be selected for this parameter group to be active.
The ability to emit particles from 3D layers in the composition is very useful. For example, you can make a logo burst out particles. See our tutorial 'Emitting Particles from Layers' at the middle of this page. See our tutorial 'Emitting Particles from Layer Grid' at the bottom of this page.
![]()
![]()
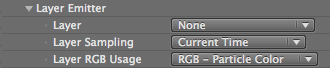
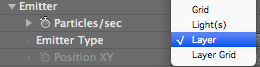
At left, the full Layer Emitter group. At middle and right, the Layer and Layer Grid options in Emitter Type.
Technical notes for Layer Emitters
Here are a couple of tips for working with Layer Emitters.
Layer pop-up
Selects a layer in the comp that will emit particles.
Particular 2.2 note: With the Particular 2.2 update, the Layer Grid emitter has been fixed. It now properly kills particles when the layer selected has particles with an alpha of 0. This happens when Layer Sampling mode is set to Still or Particle Birth Time. This fix lets Layer emitters work properly with Aux System emitters.
![]()
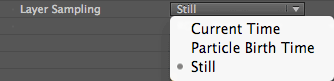
Layer Sampling pop-up
Defines how the layer information should be read.
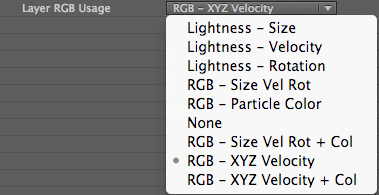
Layer RGB Usage pop-up
Defines how to use the values that are sampled from the layer used as the Layer Emitter.
Tutorial: Emitting Particles from Layers
For this project, we are going to make two compositions. Let's start by creating the layer that will be used to emit particles. Start with a new comp (Ctrl/Cmd-N), make it 640*480 at 30 fps. 5 seconds long. Name it 'Boom'.
Type out the letters Boom!. Use After Effects' stroke and fill color settings to make the word look like this:

Side Note: An image (or movie clip) could be used instead of the AE text tool. In that case there is no need to create a separate pre-comp for the image/movie. However, the image should have an alpha channel. Otherwise, if it's on a black background like our text here, black particles will be generated from the black areas.
Now we'll create the main comp. Make a new comp (Ctrl/Cmd-N). Make it 640*480 at 30 fps. and 5 seconds long. Name it 'Main'. Create a comp-sized Solid (Ctrl/Cmd-Y), choose Make Comp Size, and click OK. Apply Effect> Trapcode> Particular to the Solid. In Particular, set Emitter> Emitter Type to Layer.
Drag the 'Boom' comp from the Project Window into the Comp Window and let it snap to center. Switch the Boom layer to 3D by check-marking the 3D Layer Switch in the Timeline. Edit the layer's Scale to (50,50,50), then set the layer's X Rotation to 20 and Y Rotation to 320.
The comp should look like this:

Let's start emitting particles from this layer! In Particular, set Emitter> Layer to 'Boom'. Notice that a new light named 'LayerEmit [Boom]' is created. This is a control light that Particular uses to keep track of the layer. It is locked and shy and it's not supposed to be edited.
Set Emitter> Emitter Size Z to 0.
Try a RAM preview to see particles emitted from the text. Notice that all particles are behind the layer. To fix this, move the Boom layer to the bottom of the TLW. Then set in Particular Visibility>Also Obscure with to "Layer Emitter".
Now try a RAM preview again. The comp should look like this:

It's still hard to see exactly what's going on. Let's make it more apparent. In Particular, set Emitter> Direction to Directional. Set Direction Spread to 0. Set Velocity to 200. Set Velocity Random to 0. Finally crank up Particles/sec to 500.
Try a RAM preview again:

Now the particles are generated all over the layer and the alpha of the layer at each particle position is sampled. That alpha value is then assigned to the particle. The RGB color at the position is sampled and that becomes the particle color.
When Emitter> Layer Sampling is set to Current Time, its default setting, the Emitter layer is resampled each frame. If the Emitter layer is animated, the particle's colors (and alpha!) will change as they fly. If Layer Sampling is set to Particle Birth Time, then the particle will keep the alpha and color given at birth throughout its life.
Tutorial: Emitting Particles from Layer Grid
Now let's have a look at the Layer Grid. Change Emitter> Emitter Type to Layer Grid. Doing so activates both the Grid Emitter and Layer Emitter groups.
Then change the values in the Grid Emitter section to: Particles in X = 20 and Particles in Y = 15.
Now try a RAM preview:

So far we've used Layer Emitter> RGB Usage at RGB - Particle Color. There are other mappings available. To demonstrate the other mappings, we need a different layer to use as the Layer Emitter.
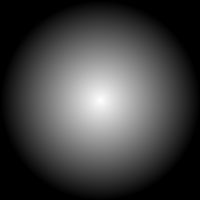
Create a new 400*400 comp, name it 'Radial'. Create a 400*400 Solid in the comp. Apply Render> Ramp to the solid. Set Ramp Shape to Radial. Set Start of Ramp to (200,200) and set Start Color to white and End Color to black.
The Radial comp should look like this:
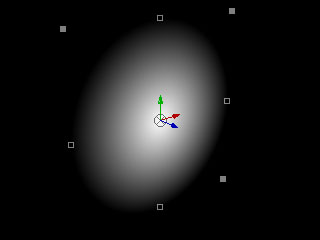
Go back to the Main comp. Delete the Boom layer. Drag the Radial comp from the Project Window into the Comp Window and let it snap to center. Switch the Radial layer to 3D and set X Rotation to 20 and Y Rotation to 320.
The comp should look like this:
In Particular, set Layer Emitter> RGB Usage to Lightness - Size. Set Particles/sec to 100. With this mapping, the particle size is affected by the lightness of the layer.
Hit RAM preview:
Try changing Emitter> Layer RGB Usage to Lightness - Velocity. Now the particle velocity is affected by the lightness. If lightness is less than 50%, the particle will emit backwards as can be seen in the dark areas. If lightness is exactly 50%. velocity will be zero. Above 50%, the particles will emit forwards.
Hit RAM preview: