Quickstart for RG Shadow plug-in
Welcome to a quick introduction to the RG Shadow plug-in. This Quickstart uses screenshots and language from After Effects but its operation in other host applications is almost the same.
RG Shadow a really fun tool with a lot of controls to let you create a 'pseudo-3D' shadow. You probably already understand the basics of casting a shadow. A light source shines in from above or behind the object that will cast the shadow. That light generates a shadow which spreads out in a direction away from the light source. If the light is close to the source object, then the shadow is short in length. The further away the light is from the object, the longer the shadow is.
Here is what happens when the Shadow plug-in renders a shadow. The shadow plug-in generates a polygon defined by 3 points and uses the alpha channel to create a shape that matches the content of the layer the plug-in is applied to. So, let's get started!
Step 1: The setup
First, let's set up a scene for our shadow. Here we have some text rotated in 'pseudo-3D" on a nice gradient background. To make the text look grounded, we will use the RG Shadow tool to create a backlit shadow that matches the ground plane. We will add softness and fade to create the look of a diffuse light behind the text.
With the Text layer selected, apply the plug-in from the Effect> Red Giant Warp> RG Shadow menu. Go to the Effect Controls palette.

Here is the initial scene that we set up with just Transformed text and a background gradient.
Step 3: Change the Baseline and Height and Slant controls
The first thing that we will see when applying the Shadow plug-in is... nothing. This will happen sometimes. Our tutorial's source object is the same size as the overall project size, and the shadow needs to be aligned properly with the image's alpha channel.

The default shadow applied to the image. The yellow line at the bottom are the points that define the shadow plane.
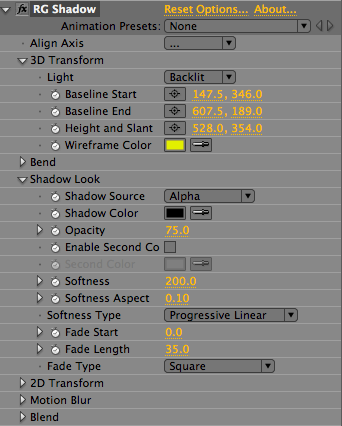
To adjust the shadow to match, we need to set the three points: Baseline start, Baseline end, and Height and Slant, to the proper position. Drag the points to match the base of the characters and then set the Height and Slant point out in front of the text.

The controls are in position, but still no shadow.
Step 4: Set the Light to Backlit
Once the position is set, you need to set the plug-in to have front or back lighting. By default, the plug-in is set to create front lighting, and the shadow would then naturally appear behind the text. But in this case, we want the light to appear behind the text, so we change the Light pop-up from Frontlit to Backlit.
NOTE: We use the term 'baseline' to mean a few different things for the Shadow plug-in. One definition is when 'baseline' refers to the wireframe line that connects the Start, End and Height/Slant points. That baseline always defines the generation point of the shadow. 'Baseline' also refers to the invisible ground line that the source image sits on.

![]()

At left, set the Light control to Backlit. At right, the resulting image now produces a believable 3D shadow.
Step 5: Adjust the Softness
Many of the settings in the Shadow Look section will stylize the shadow's appearance. Let's explore some of them, starting with the three Softness controls.
Softness controls the blur value through the shadow. This control affects the entire shadow, though you mostly notice it around the shadow edges. Let's change the Softness to 200 so the shadow looks more blurred. And you will also set the Softness Aspect to 0.1. These two values will yield a diffuse shadow that gets softer parallel to the baseline, increasing in softness at the edge opposite the baseline.

![]()

At left, Softness at 200, Softness Aspect at 0.1, makes the shadow look lit by a spotlight from behind. At right, the Shadow Look> Softness controls.
Step 6: Adjust the Fade Start and Length
Let's keep the Softness Fade on Progressive Linear. Speaking of fade... Let's set the two Fade controls.
Fade Start sets where the shadow begins to fade. It is measured as a percentage of the height of the source image. At the default of 0, the fade starts at the baseline of the shadow. At 100, the fade starts at the top of the shadow. If the fade starts farther into the shadow, the whole shadow will be more distinct and opaque. For our shadow, you should set the Fade Length to 35 and set the Fade Type to Square—this will create a more prominent fade.

![]()

At left, Fade Length at 35, Fade Start at Square. At right, the Shadow Look> Fade controls.
In conclusion
Our shadow is now ready to animate! When using the Shadow plug-in, you will almost always go to the 3D Transform group as your first steps to set up the shadow. However, keep in mind that you don't have to go in the order we have just shown. You may want to change your Light direction first or adjust the Height/Slant of the shadow, and then redefine that setup with Baseline Start, Baseline End or Align Axis. We hope this shows you a taste of what the RG Shadow tool is capable of, creating great-looking 3D shadows without the hassle of setting up a 3D scene.

The final settings used for our Shadow.