How Primatte works (very technical)
Primatte has professional options for creating mattes from any object shot against a color background, and can create a matte from any color background. At the heart of Primatte Keyer is its patented Polyhedral Slicing Algorithm. To use Primatte most effectively, it helps to have an understanding of how the algorithm works. This page will give you a fundamental explanation of that process.
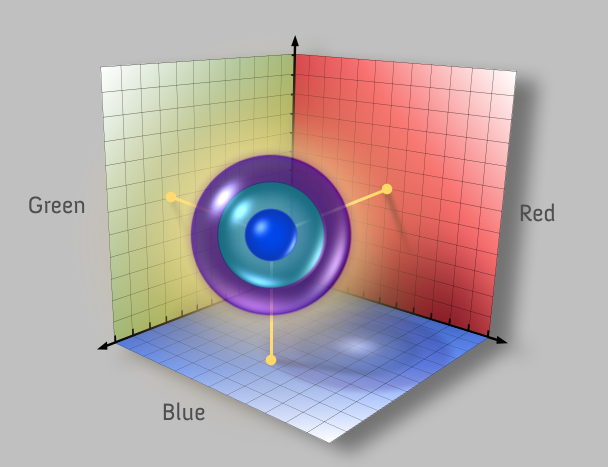
3D Color Space
The Polyhedral Slicing Algorithm operates in three-dimensional RGB color space. Any color can be created by mixing varying levels of the three primary colors, Red, Green, and Blue (RGB). By assigning each of the individual RGB color components to one of the X, Y, and Z axis, a color can then be represented by a point located within the virtual XYZ space.
For example, black is represented by the values 0,0,0 in RGB color space. In 3D color space black is shown as a point located a 0,0,0. Yellow, which consists of red and green with no blue component (RGB 100,100,0), is located at 100,100,0 in 3D space.
As soon as you make your initial sample of the foreground image (the Select BG function), Primatte Keyer begins to separate the foreground pixels into one of four separate categories. These four categories are defined in 3D space by three 128-sided polyhedrons, which can be distorted into many different shapes to accommodate the range of colors selected in future samples.
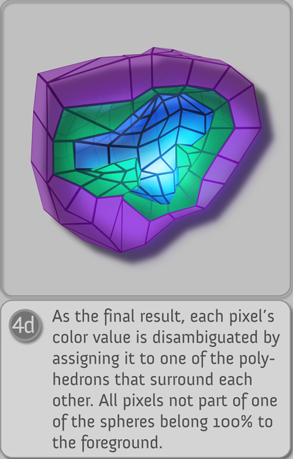
The image below shows a diagram of the 3D color space model. The three polyhedrons (one inside the other) define four regions in the RGB color space and divide al the colors in the foreground clip into one of those four regions.
Categories of color regions
If we look at these four regions individually we can see that each has a particular property. Lets explore these regions and see how they work together during the keying process.

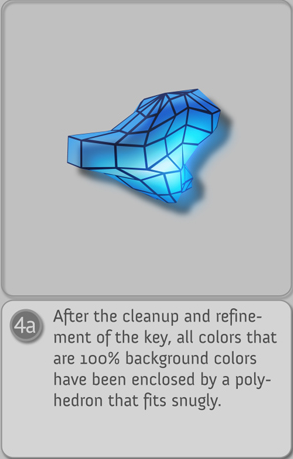
Category One: Represents the area defined by the small center polyhedron. It contains all of the pixels in the foreground image designated as 100% background. When you make your initial sample or use the Clean BG Noise tool, the sampled colors are placed here. Any foreground colors in the small polyhedron will be replaced entirely with pixels from the background image.
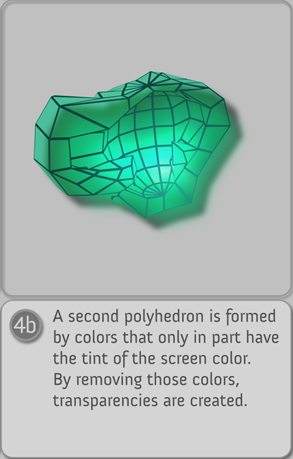
Category Two: Represents the area between the small polyhedron and the medium polyhedron. Pixels located in this area make up the semi-opaque transition areas between foreground and the background. Here you will find pixels for such things as the soft edges of foreground objects, wisps of hair, smoke, and motion blur.
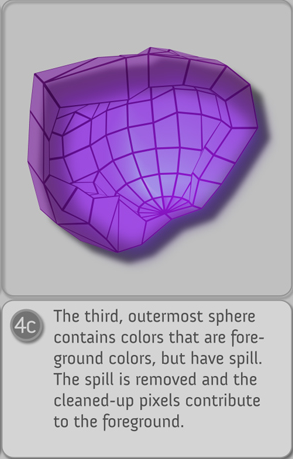
Category Three: Represents the area between the medium and large polyhedrons. These are pixels designated as 100% foreground, but have spill suppression applied to them. This is for foreground pixels that need to have the spill color removed but are otherwise to remain 100% foreground. When you use Spill Sponge or do a Spill adjustment, you add pixels to this area.
Category Four: Encompasses the entire area outside of the large polyhedron and is reserved for pixels in the foreground image that remain completely unchanged during the keying process. All the foreground colors that are outside the large polyhedron are exactly as they were in the original foreground image.
Expansion
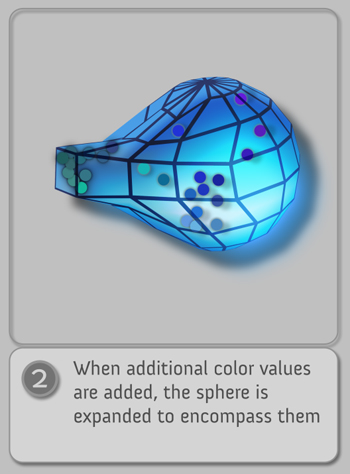
Earlier we said that after making your initial sample, Primatte would separate the foreground pixels into one of four separate categories. Now that you better understand the Polyhedral Slicing process, a more accurate description is that Primatte Keyer expands the volume of the 128-sided polyhedron by the smallest amount possible to encompass the newly sampled pixels. The pixels themselves never move, the polyhedrons change shape to envelope them.
When we say that the polyhedron has expanded, you might envision it expanding like a balloon being filled with air — an evenly-distributed, spherical expansion of the entire surface. If the small polyhedron did indeed expand this way, you would encompass within it a large number of blue or green background pixels that you may not want keyed out, significantly decreasing the accuracy of the keying process.
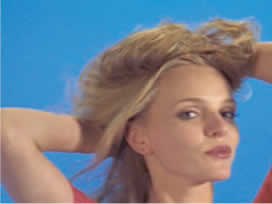
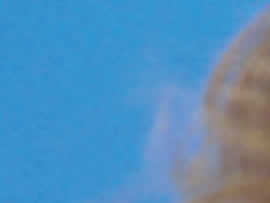
For example, the image above right shows us a close-up region of very fine, wispy blonde hair detail from the image at its left. The blonde hair will be, in many areas, very close to blue in color. This hair is comprised of pixels with a color very close to the sampled background color, but because they are part of the foreground object you would not want them keyed out completely. All the pixels located within the small polyhedron are 100% keyed out, so if the polyhedron expanded like a balloon you stand a very good chance of keying out detail that you would otherwise want to keep. These hair pixels should be encompassed in the area between the small and medium polyhedrons, where they will be partially keyed and have the blue tint removed from their color.
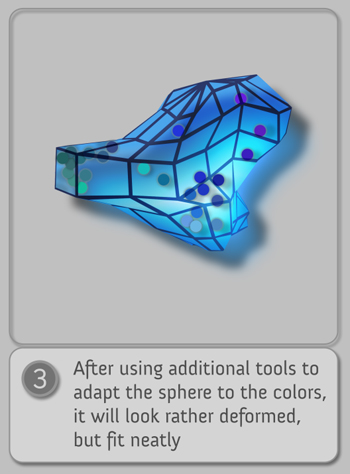
When you sample a group of pixels, Primatte expands the polyhedron in a manner more like the motion of a single-celled organism. This extends a 'pseudopod' out to engulf only the sampled pixels, creating an extremely accurate keying process.
Examples
In the image below, we see how the polyhedron would look after the sampling of a single pixel of foreground color, such as when you make a single click in the blue- or greenscreen area in Select BG mode. The center of the polyhedron represents the RGB pixel that corresponds to the exact foreground pixel color that was selected during the initial sample (or the average of the sampled pixels if more than one was initially selected). Primatte Keyer also grabs a few other pixels very near the sampled pixel value to set a starting size for the polyhedron.
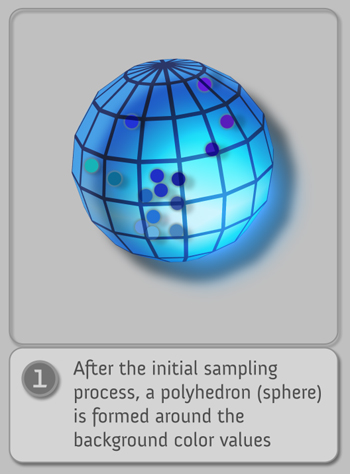
Below left, a single set of XYZ coordinates does not, by mathematical definition, occupy any three-dimensional space — you need a minimum of three sets of XYZ coordinates to define a three dimensional area or volume. By also keying pixels that are very near the color value of the sampled pixel, Primatte arbitrarily obtains enough sets of coordinates to calculate three dimensional area or volume and generates the initial size of the small polyhedron by encompassing the 3D space occupied by these sampled pixels.
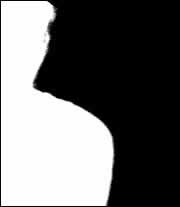
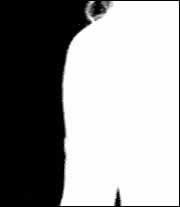
Below right, the white speckled area near the person in the black and white 'matte view' image above represent the blue or green backing screen pixels not enclosed by the small polygon. These pixels need to be sampled during a Clean BG Noise operation. When the sampling is complete (i.e. when you release the mouse button) Primatte Keyer calculates the sample, and the polyhedron expands to encompass the newly selected pixels resulting in the clean background area in the image immediately below.

Below left, if you think of the space where the polyhedron is located as being completely surrounded by pixels of all different colors, you can see how the pseudopod method allows you to pull a far more specific matte than if the polyhedron expanded like a balloon.
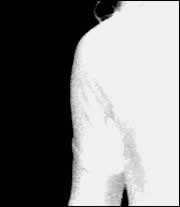
Below right, the final result of a finished matte may result in the small Primatte polyhedron looking something like this.
Additionally, when the dark areas in the foreground area are sampled in the Clean FG Noise operation, a similar process is accorded the medium and large polyhedrons. The result is a clean foreground area, as shown below.
Here is a pictorial description of the polyhedrons.