Interface> Preview Area
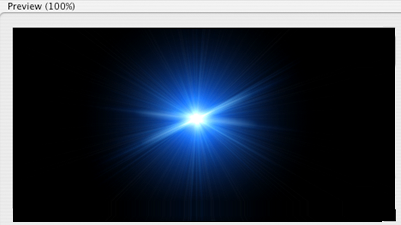
The Preview Window appears in the top-center area of the Knoll interface. This is the main viewing and positioning window for the lens flares. The Preview shows the combined elements and gives you controls to test the effect of brightness, color, position, and scale changes. Directly underneath the Preview Window are the Layer Options and Master Controls.

![]()
The Preview Window.
How to reposition the flare
When you first apply a light effect – either through the Preset List or individual elements – the effect may not appear where you want it to. That’s easy to change. To set the position of the flare, click and drag within the Preview Window. The flare will move and adjust itself accordingly. Most light elements also have a Position parameter that works in conjunction with the cursor click-and-drag.
To move around the Preview Window itself, you can hold down the spacebar key to get a grabber hand.
Contextual Menu
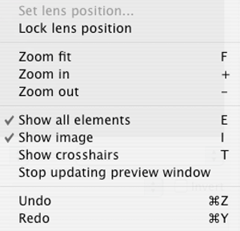
Right-Click in Windows [Control-Click on a Mac] within the Preview Window to bring up a contextual menu. This is a collection of options and hot keys that can be turned on and off or accessed for assistance when creating the lens flare.

The Contextual menu.
Contextual Menu> Set lens position
This pops up a window that contains text entry boxes for X and Y pixel coordinates. Use this when you know exactly where the flare should be within your image.
Contextual Menu> Lock lens position
By default, the lens flares are locked to a central point/horizon line within the Preview window. Dragging the cursor around will make the elements realistically move together, adjusting towards the center of the flare. Turning ‘Lock lens position’ on will lock all the lens elements down to their current position. This allows the flare to be positioned globally; all of the elements will move as one.
Contextual Menu> Zoom fit
Selecting this will fit the image to the size of the Preview area. Alternatively, you can press F on the keyboard.
Contextual Menu> Zoom in
Zooms the Preview area in. As you zoom, horizontal and vertical sliders will appear so you can navigate around the image. You can also press the + key on the keyboard or hold down Command+I/Mac [Ctrl+I/Win].
Contextual Menu> Zoom out
Zooms the Preview area out. The horizontal and vertical view adjustment sliders will disappear once the view fits or becomes smaller than the available Preview area. Hit the - key on the keyboard to zoom out or hold down Command+O/Mac [Ctrl+O/Win].
Contextual Menu> Show all elements
This is on by default. Turning this off will make all the flare elements, and subsequently the entire flare, disappear. Hit the 'E' key to turn the elements on and off.
Contextual Menu> Show image
This is on by default. This shows the layer to which you are applying the lens flare. Turning this off will render the lens flare on black in the Preview window. Hit the 'I' key on the keyboard to toggle this on/off.
Contextual Menu> Show crosshairs
Off by default. When turned on, this will render a yellow reticule that pinpoints the center of the flare. You can use this to make sure that your flares are accurately placed in your image. Hit the 'T' key to toggle on and off.
Contextual Menu> Stop updating preview window
Off by default. Turn this on to stop the Preview area from updating while you change parameters. This is helpful if you have several elements rendering together and your system begins to bog down.
Contextual Menu> Undo
Undoes up to the previous 40 actions. Hit Command+Z/Mac [Ctrl+Z/Win] to activate.
Contextual Menu> Redo
Reapplies the last action. Hit Command+Y/Mac [Ctrl+Y/Win] to activate.