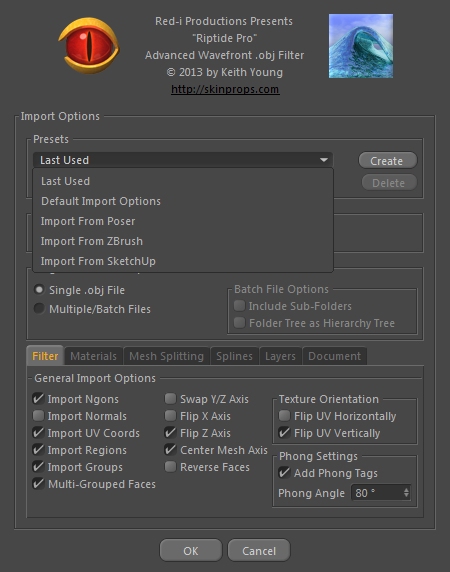
Import/Export - Presets
At the top of the .Obj Import and Export dialogs is a drop-down menu that allows you to create, modify and delete option Presets...

...(the Presets section of both the Import and Export dialogs work the same, but only the Import dialog is shown above).
These Presets store and set all of the available options with a single selection. When first installed, the plugin comes with a few pre-defined Presets for you, but you can create as many as you like. Note that there are two 'special-case' Presets at the top of the list...
"Last Used" - This Preset is always set to whatever options were set when the dialog was last opened (it is automatically updated). This Preset can not be deleted, but you can rename it if you choose to (to use your native language, for example).
"Default Import/Export Options" - This Preset uses some of the most common options (nothing too fancy) and can be used as a starting point when creating other Presets. This also gives me a 'known' set of options to work from, for support-related issues. This one can not be changed ("Update" is ghosted) and can not be deleted, but you can rename it if you choose to.
...in the image above, you also see a few of the pre-defined Presets (for Poser, ZBrush and SketchUp).
Selecting a Preset:
To select a Preset, simply
choose one from the drop-down menu/list. As soon as a Preset
is selected, the rest of the dialog options will be changed to
reflect those settings, including the Mesh Scaling value and
all other options on each of the tabs at the bottom.
Preset Options:

Creating a new Preset:
To create a new Preset, simply click on the "Create" button and give it a name in the dialog that opens. The new preset will be set to reflect whatever the current options are set to. If you then make any changes and want to keep those changes for future use, be sure to click the "Update" button before dismissing the dialog.
Updating a Preset:
To update a Preset to the current
settings, simply click the "Update" button.
Clicking this button will store all current options into the
currently selected Preset.
Applying a Preset:
If you have changed some options,
but not yet clicked on the "Update" button,
then the "Apply" button will re-apply the currently
selected preset settings. Note that this would be the same as
re-selecting that Preset from the drop-down menu, so it's just
a short-cut/handy way to revert back to those settings - you
do not need to click on the "Apply" button after
Selecting one from the drop-down menu.
Renaming a Preset:
To rename a Preset, simply
click the "Rename" button and enter the new
name in the dialog that opens.
Deleting a Preset:
To delete a Preset, simply click the "Delete" button - the currently selected preset will be deleted. Again, the first two special-case presets can not be deleted, but the other pre-defined ones can, along with any you might have created.