Mesh Deformation Data (MDD) Deformer
Starting with v2.5, Riptide Pro can now Import .mdd files using a 'Deformer' object. This method of importing .mdd files is more flexible than the "Import .mdd file" option which just adds Point Level Animation (PLA) to the mesh - it has a smaller memory foot-print (it loads animation data as needed on a per-frame basis) and you can adjust the play-back options in real-time (you can even animate them).
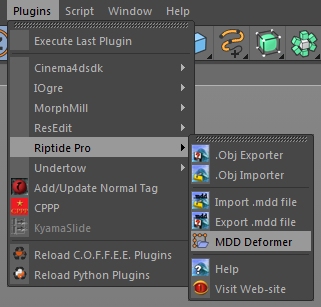
The plugin/command can be found in the Riptide Pro plugins menu...
The contents of these (.mdd) files are basically just sets of (new/adjusted) vertices/points for a mesh, from different frames of some animation. Because of this format, the vertex/point count in the .mdd file must match the mesh being altered. The order of those vertices must also match [Fortunately, Riptide Pro preserves the vertex-ordering when Importing .obj files, but Cinema 4D's built-in .obj Import does not].
Once you have added a MDD Deformer to the scene, attach it as a child of the mesh you wish to deform. When the deformer is selected, you can modify it's settings in the Attribute Manager, as usual...
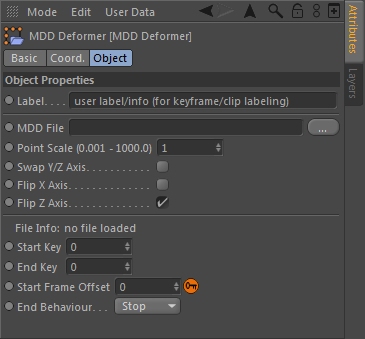
...the various options are described below in more detail.
Label
This text string does not affect the plugin in any way - it is simply for the user's convienience.
MDD File
Use this option to load/import a .mdd file that is appropriate for the mesh that the deformer is attached to (no animation will take place if there is no file loaded).
Point Scale / Axis Orientation
These are all the same options available with the Import/Export .mdd and .obj file features of the plugin, however the mesh/point scaling is (currently) handled differently...
[NOTE: As of v2.6, all of the .mdd Import/Export options (including the MDD Deformer) are limited to scaling Up OR Down by a factor of 1x -> 1000x, but that value is specified differently in the Import/Export dialogs vs. the MDD Deformer - continue reading below for details.]
...for the .obj Import/Export and the .mdd Import/Export dialogs, you specify either "Up" or "Down" and a whole number "Scale Factor" (such as 1, 10, 100, 1000, etc). For the MDD Deformer, there is (currently, at least) only a single whole+fractional value for specifying the scale (from 0.001 -> 1000.0). Note that a value of 0.001 would be the same as "Scaling Down by a factor of 1000". Just to give a better idea:
Scaling Up
1.0 = no change (1:1)
10.0 = scale Up by a factor of 10 (10:1)
100.0 = scale Up by a factor of 100 (100:1)
1000.0 = scale Up by a factor of 1000 (1000:1)
Scaling Down
1.0 = no change (1:1)
0.1 = scale Down by a factor of 10 (1:10)
0.01 = scale Down by a factor of 100 (1:100)
0.001 = scale Down by a factor of 1000 (1:1000)
...while the overall 'range'
of scaling (up or down by up to 1000x) is the same, the MDD Deformer
scaling is more flexible, since you can (for example) scale by
1.5 (150%) or 0.75 (75%), which you can't achieve with the current
.mdd (or .obj) Import/Export methods.
File Info
This is a file information display, that lists various information about the .mdd file, including the number of points, the total number of keys (key frames) and the total animation time.
Start Key / End Key
These options let you set the start and end key frames to use from the .mdd file. Note that the frame values are "zero-based", so if the file contains 100 keyframes, they would be numbered from 0 -> 99.
Beside each key value, the "keyframe time" (the time value directly from the .mdd file) for that keyframe is also displayed, so a value of "00:00:13" would be 13 seconds into the animation.
Start Frame Offset
This option lets you set the frame of the Cinema 4D timeline where the animation should start. If you scrub the timeline to some point, you can click on the little orange key to the right to set the 'current' frame as the Start Frame Offset.
End Behavior
This option lets you specify what the deformer should do when it runs out of animation keys from the file...
Stop - the mesh animation stops (becomes inactive
/ NOT applied to the mesh - similar to disabling the deformer).
Clamp - the mesh animation stops at the last-loaded/valid
animation frame (that frame IS still applied to the mesh).
Loop - the mesh animation loops back to the begining.